• Skip to primary navigation
  • Skip to main content
  • Skip to primary sidebar
  • Skip to footer

A House We Built

Custom House Designed by Husband & Wife Team | Modern Farmhouse Inspired

  • Shop Our Home
  • Sources by Room
    • All Sources & FAQs
    • Kitchen Sources
    • Pantry Sources
    • Living Room Sources
    • Dining Room Sources
    • Home Office Sources
    • Laundry Room Sources
    • Entryway Sources
    • Mudroom Sources
    • Gallery Wall Sources
    • Reading Room Sources
    • Theater Room Sources
    • Game Room Sources
    • Guest Bedroom Sources
    • Primary Bedroom Sources
    • Primary Closet Sources
    • Primary Bathroom Sources
    • Powder Bathroom Sources
    • Buffalo Check Bathroom Sources
    • Basement Bathroom Sources
    • Basement Sources
    • Stairs, Landings & Hallways
    • Paint Colors and Stain Recap
    • Cleaning Sources & Routines
  • Tutorials
    • How to Make a Staircase Gallery Wall
    • How to Make Textured Canvas Art
    • How to Install Shiplap
    • How to Build a Slat Wall
    • How to Paint an Ikea Dresser
    • How to Build Bypass Barn Doors
    • How to Build a Farmhouse Table and Benches
    • How to Build a Rustic Sideboard
    • How to Build a Slat Sideboard
    • How to Make a Sofa Pit
    • How to DIY a Faux Brick Wall
    • How to Build a Window Seat
    • How to Build a Paneled Accent Wall
    • How to DIY a Functional Play Kitchen
    • How to Stencil a Wall
    • How to Build a Round Table
    • How to Build a Console Table
    • How to Make Paper Stars
    • How to Make Paper Mache Bowls
    • How to Make Clay Links
    • How to Texture Bowls & Vases
    • How to Install Open Shelves
    • How to Make Wood Block Art
    • How to Make a Wood Bead Garland
    • How to Build Cabinet Doors
    • How to Build a Wood Countertop
    • How to DIY a Nightstand Charging Drawer
    • How to Make a Wheat Wreath
    • How to Hang Gallery Wall Frames
    • How to Stain Stairs and Paint Risers
    • How to Make Industrial Stair Railings
    • How to Build a Window Seat Cushion
    • How to Make Salt Dough Ornaments
    • How to DIY a Modern Mantel Christmas Tree
    • How to DIY a Wooden Christmas Village
    • How to Build a Wood Christmas Tree Collar Box
    • How to Make Paper Christmas Trees
  • Cats
    • Cat Room Tour & Litterboxes
    • Cat-Related Sources & Cleaning Tips
    • How to Cat-Proof Christmas Trees & Decor
    • How to Stop Cats from Scratching Furniture
    • How to Stop Cats from Playing with Decor
    • How to Train Cats and Kittens
    • How to Cope with Cat Allergies
    • How to Introduce New Kittens to Older Cats
  • Christmas
    • Christmas Decor Favorites 2023
    • How to Build a Wood Christmas Tree Collar Box
    • Neutral Christmas Present Wrapping
    • How to Make Paper Christmas Stars
    • How to Make Paper Christmas Trees
    • How to Make Salt Dough Ornaments
    • DIY Holiday Art Ideas
    • How to Cat-Proof Christmas Trees & Decor
    • How to Make Modern Tabletop Trees
    • How to Make a Wooden Christmas Village
    • Holiday Cheese & Snack Boards
    • Christmas Decor 2021
    • Christmas Decor 2020
    • Christmas Decor 2019
    • Gingerbread House & Cookies Recipe
    • Puff Tastry Christmas Tree Recipe
    • Christmas Decor 2018
  • Cleaning
    • Cleaning Sources & Routines
    • Minimalism: How To Get Started
    • Cat-Related Cleaning Tips
  • Recipes
    • Apple Turnovers Recipe
    • Baked Pumpkin Donuts Recipe
    • Banana Chocolate Chip Bread Recipe
    • Blueberry Lemon Cake Recipe
    • Cheese & Cracker Snack Boards
    • Chocolate Chip Cookie Recipe
    • Christmas Crack Recipe
    • Chocolate Crinkle Cookies Recipe
    • Cinnamon Rolls Recipe
    • Cinnamon Star Pastry Recipe
    • Coconut Curry Squash Soup Recipe
    • Creamy No-Cheese Pasta Sauce Recipe
    • Crumble Recipe
    • Easy Veggie Pasta Recipe
    • Fresh Rolls Recipe
    • Garlic Flatbread Recipe
    • Gingerbread Biscotti Recipe
    • Gingerbread House & Cookies Recipe
    • Healthy Hearty Salad Recipe
    • Homemade Bread Recipe
    • Lasagna Recipe
    • Molasses Cookies Recipe
    • Oatmeal Raisin Cookies Recipe
    • Pad Thai Recipe
    • Pesto Pasta Recipe
    • Potato Curry + Naan Bread
    • Puff Pastry Christmas Tree Recipe
    • Pumpkin Donut Bites Recipe
    • Pumpkin Loaf Recipe
    • Pumpkin Oat Muffins Recipe
    • Roasted Red Pepper Pasta Recipe
    • Rocky Road Bars Recipe
    • Vegan Bolognese Pasta Sauce
    • Vegetable Soup Recipe
  • About
    • About Us
    • Website Roadmap
    • Shop Our Home
    • Minimalism: How To Get Started
    • Privacy Policy
  • Blog

admin

How to DIY a Modern Wooden Christmas Tree

November 7, 2019 by admin 5 Comments

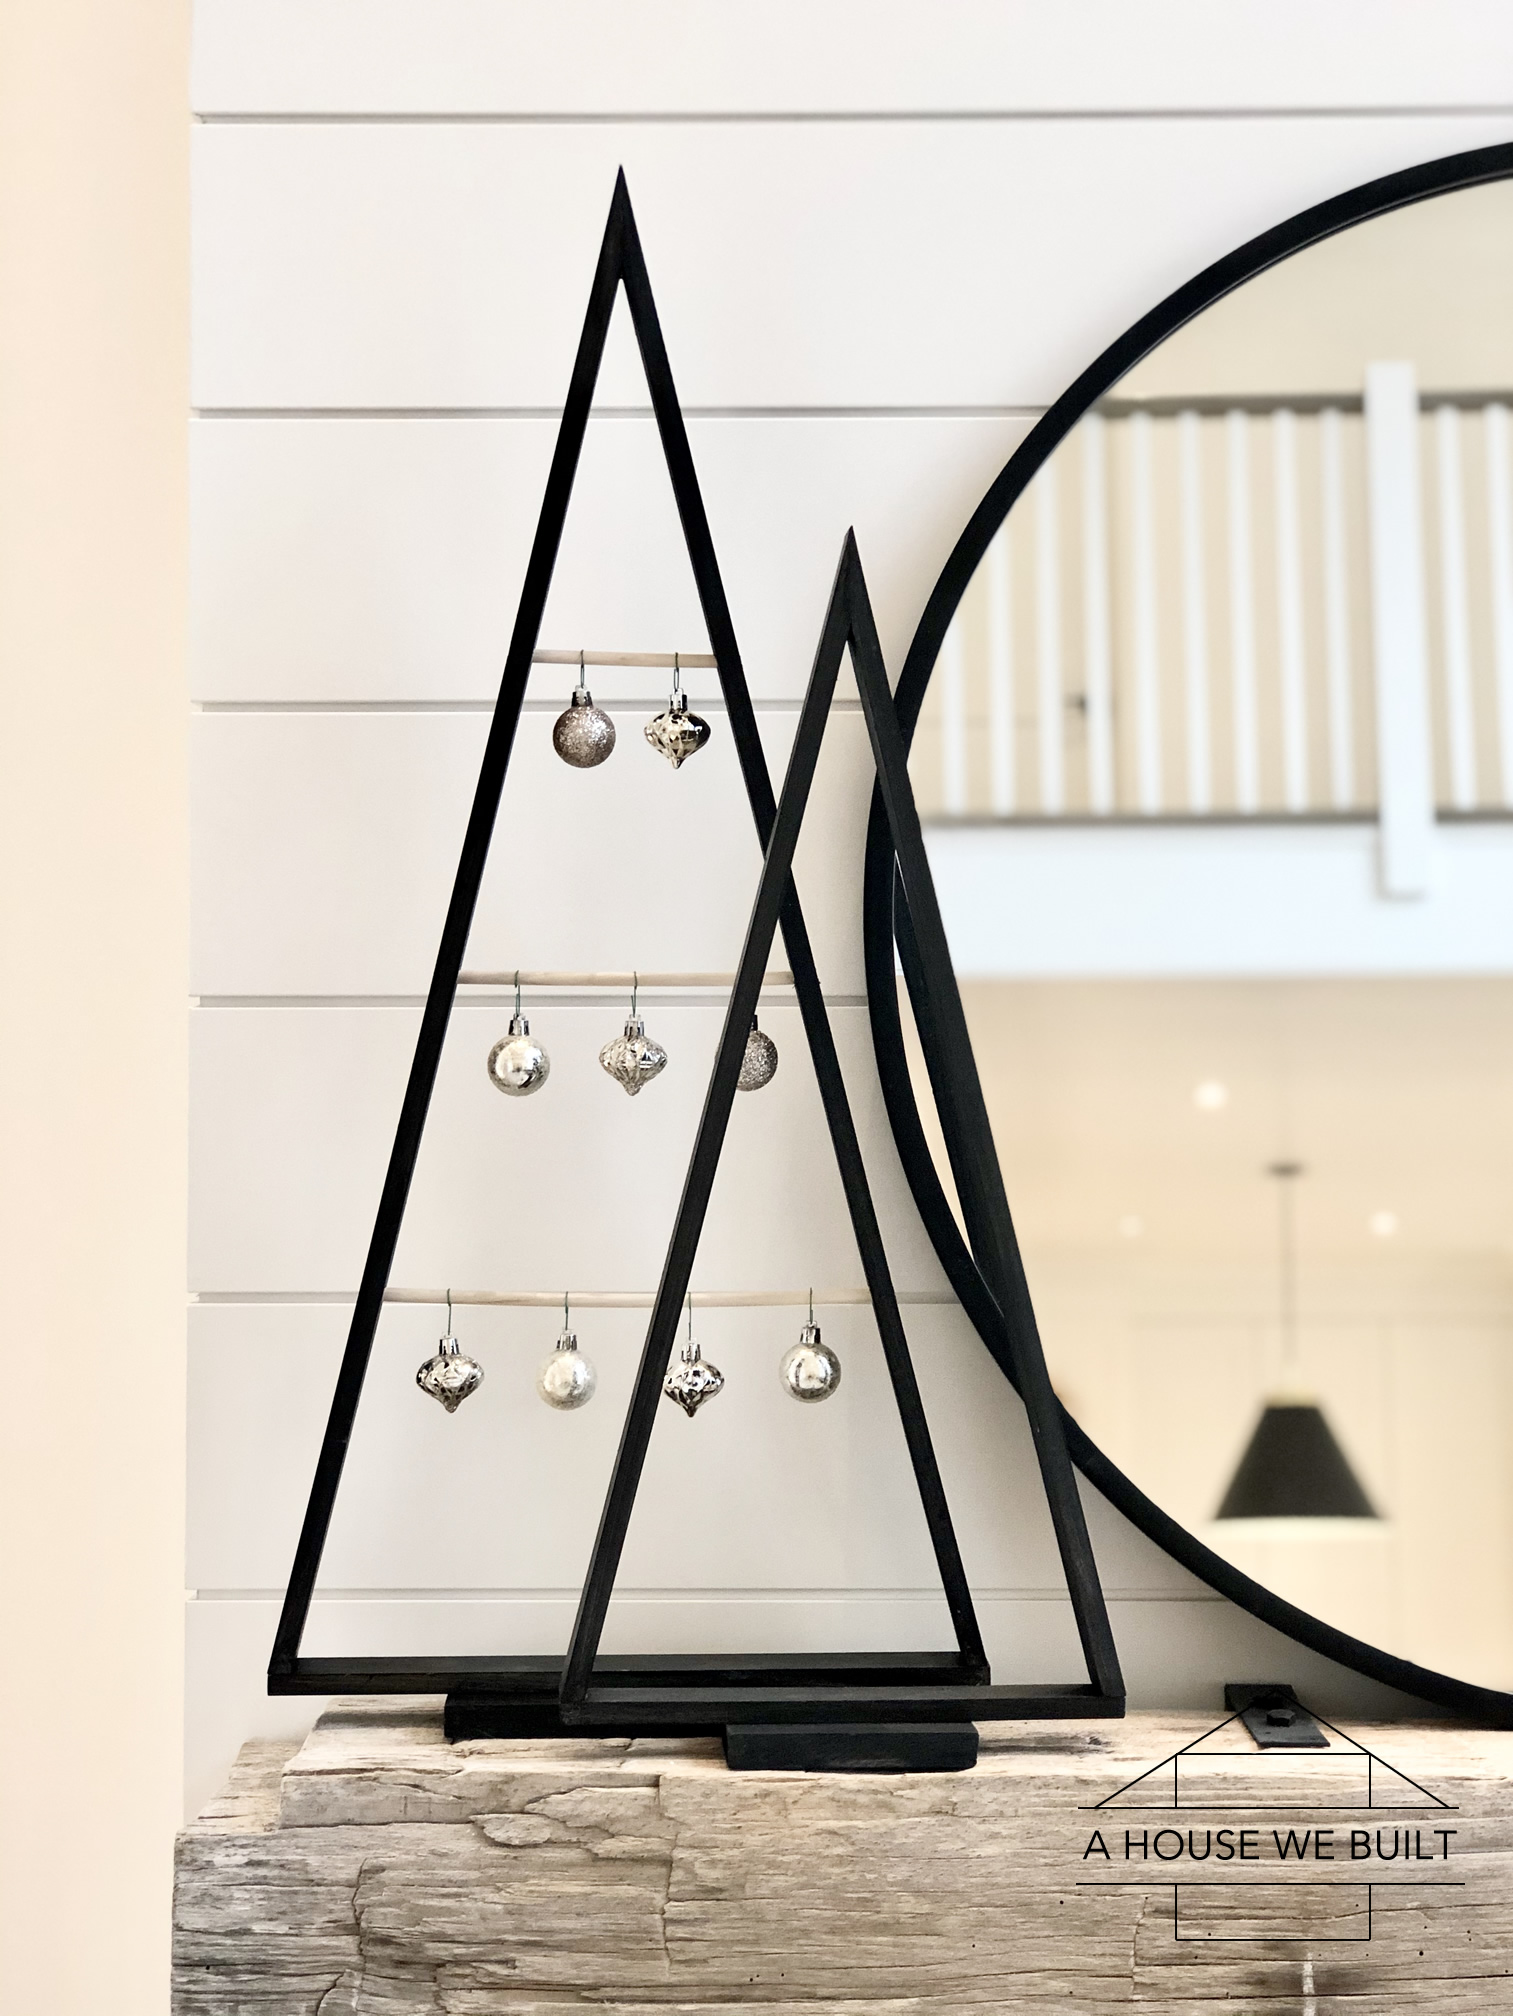
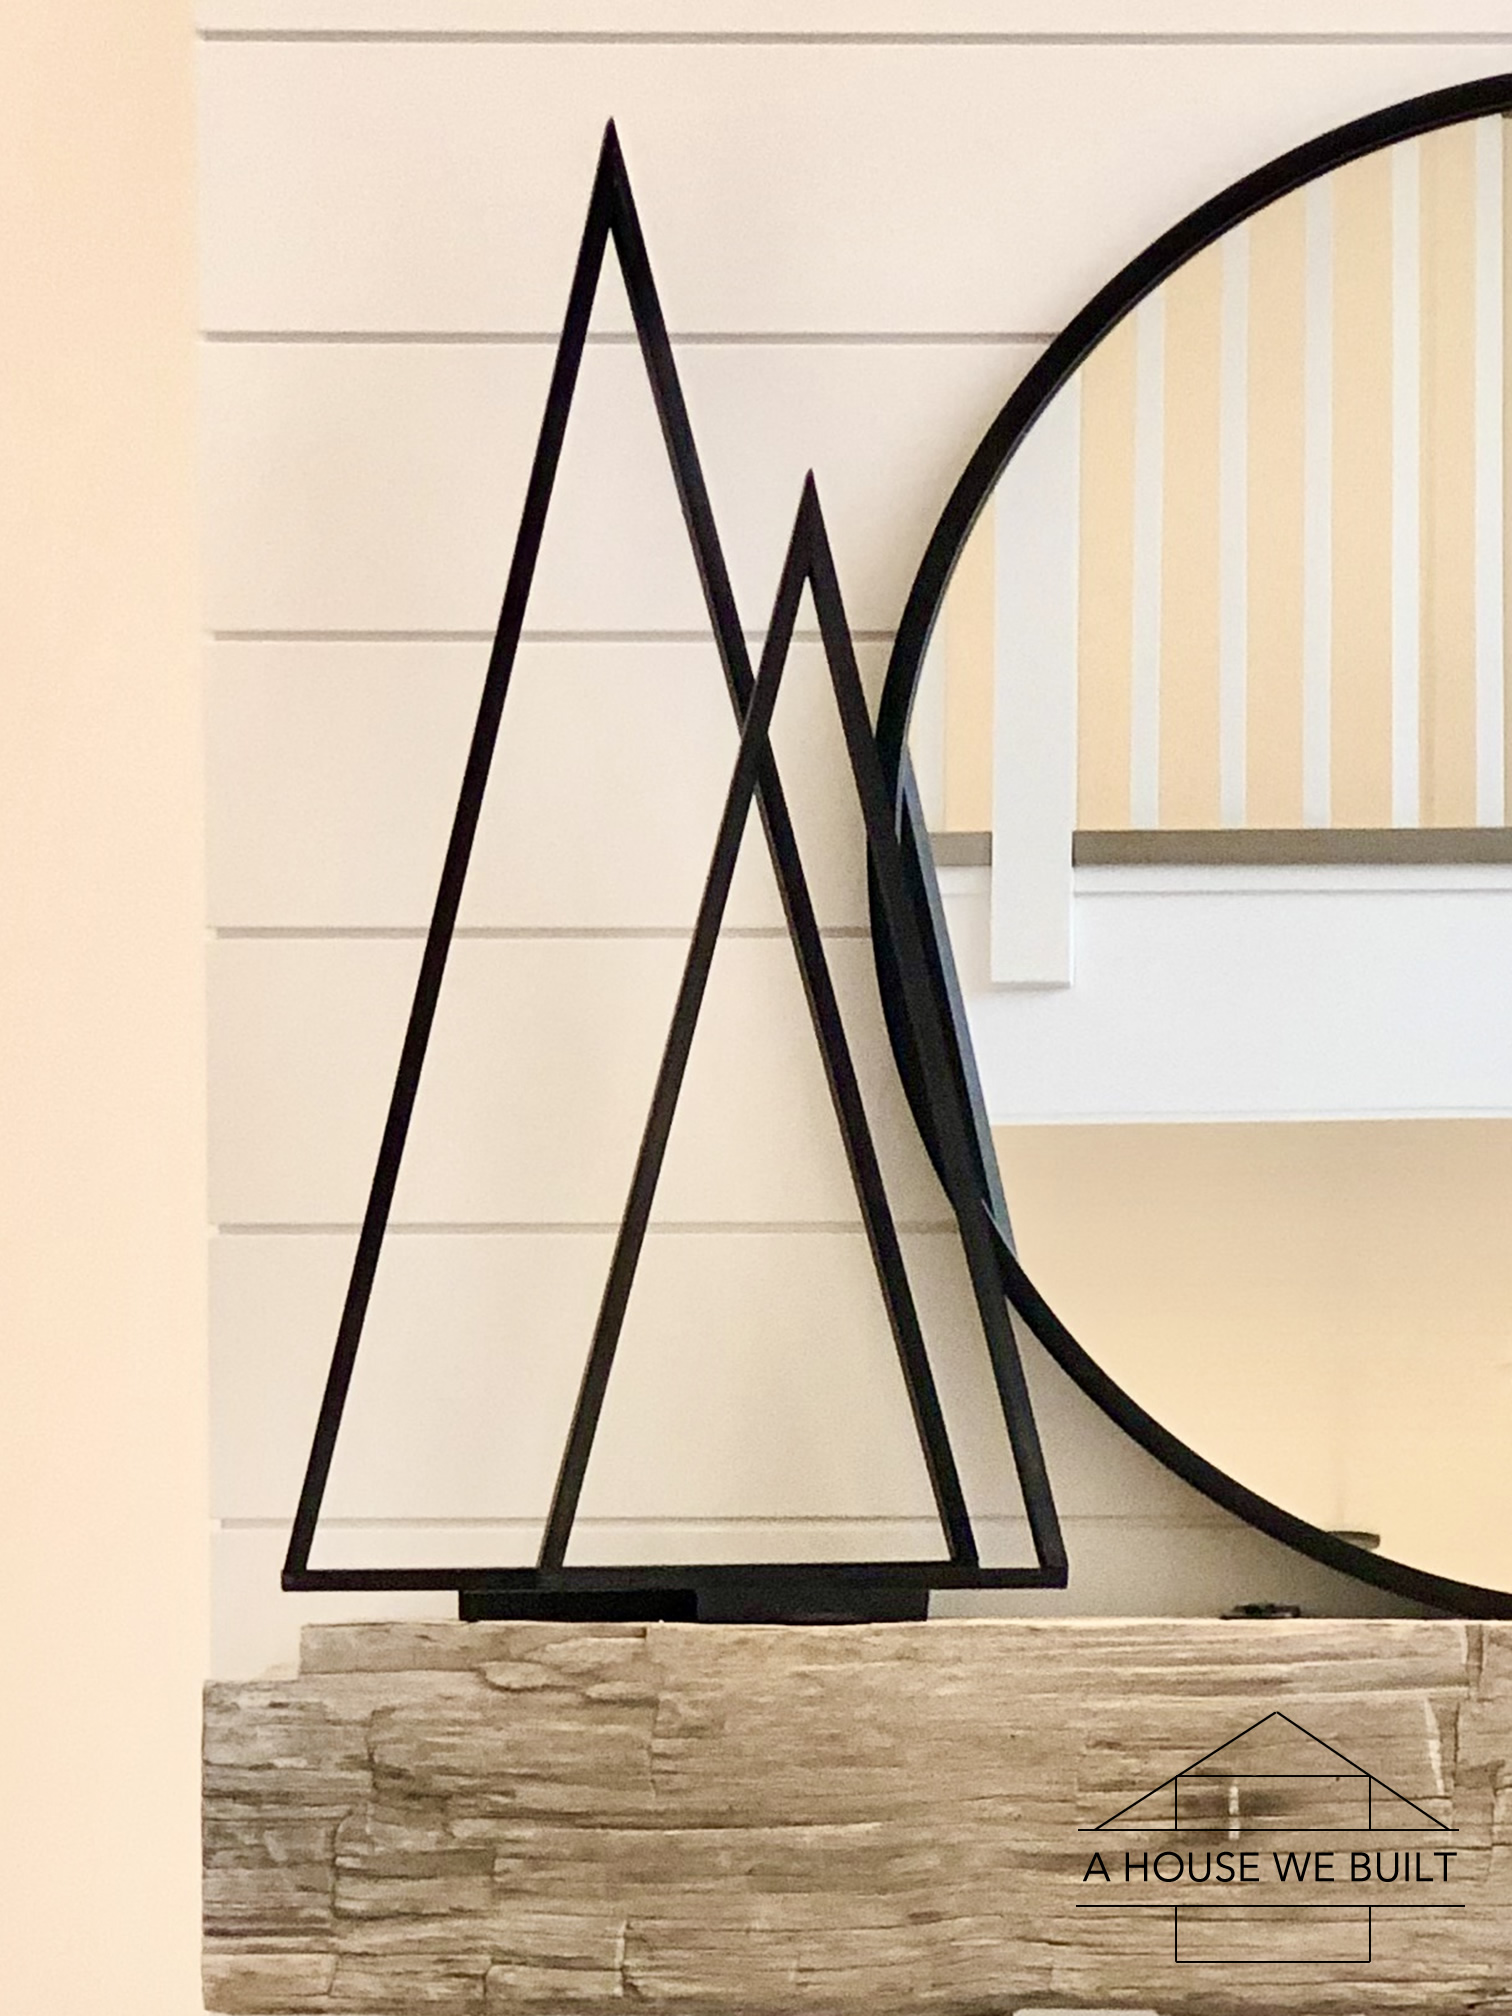
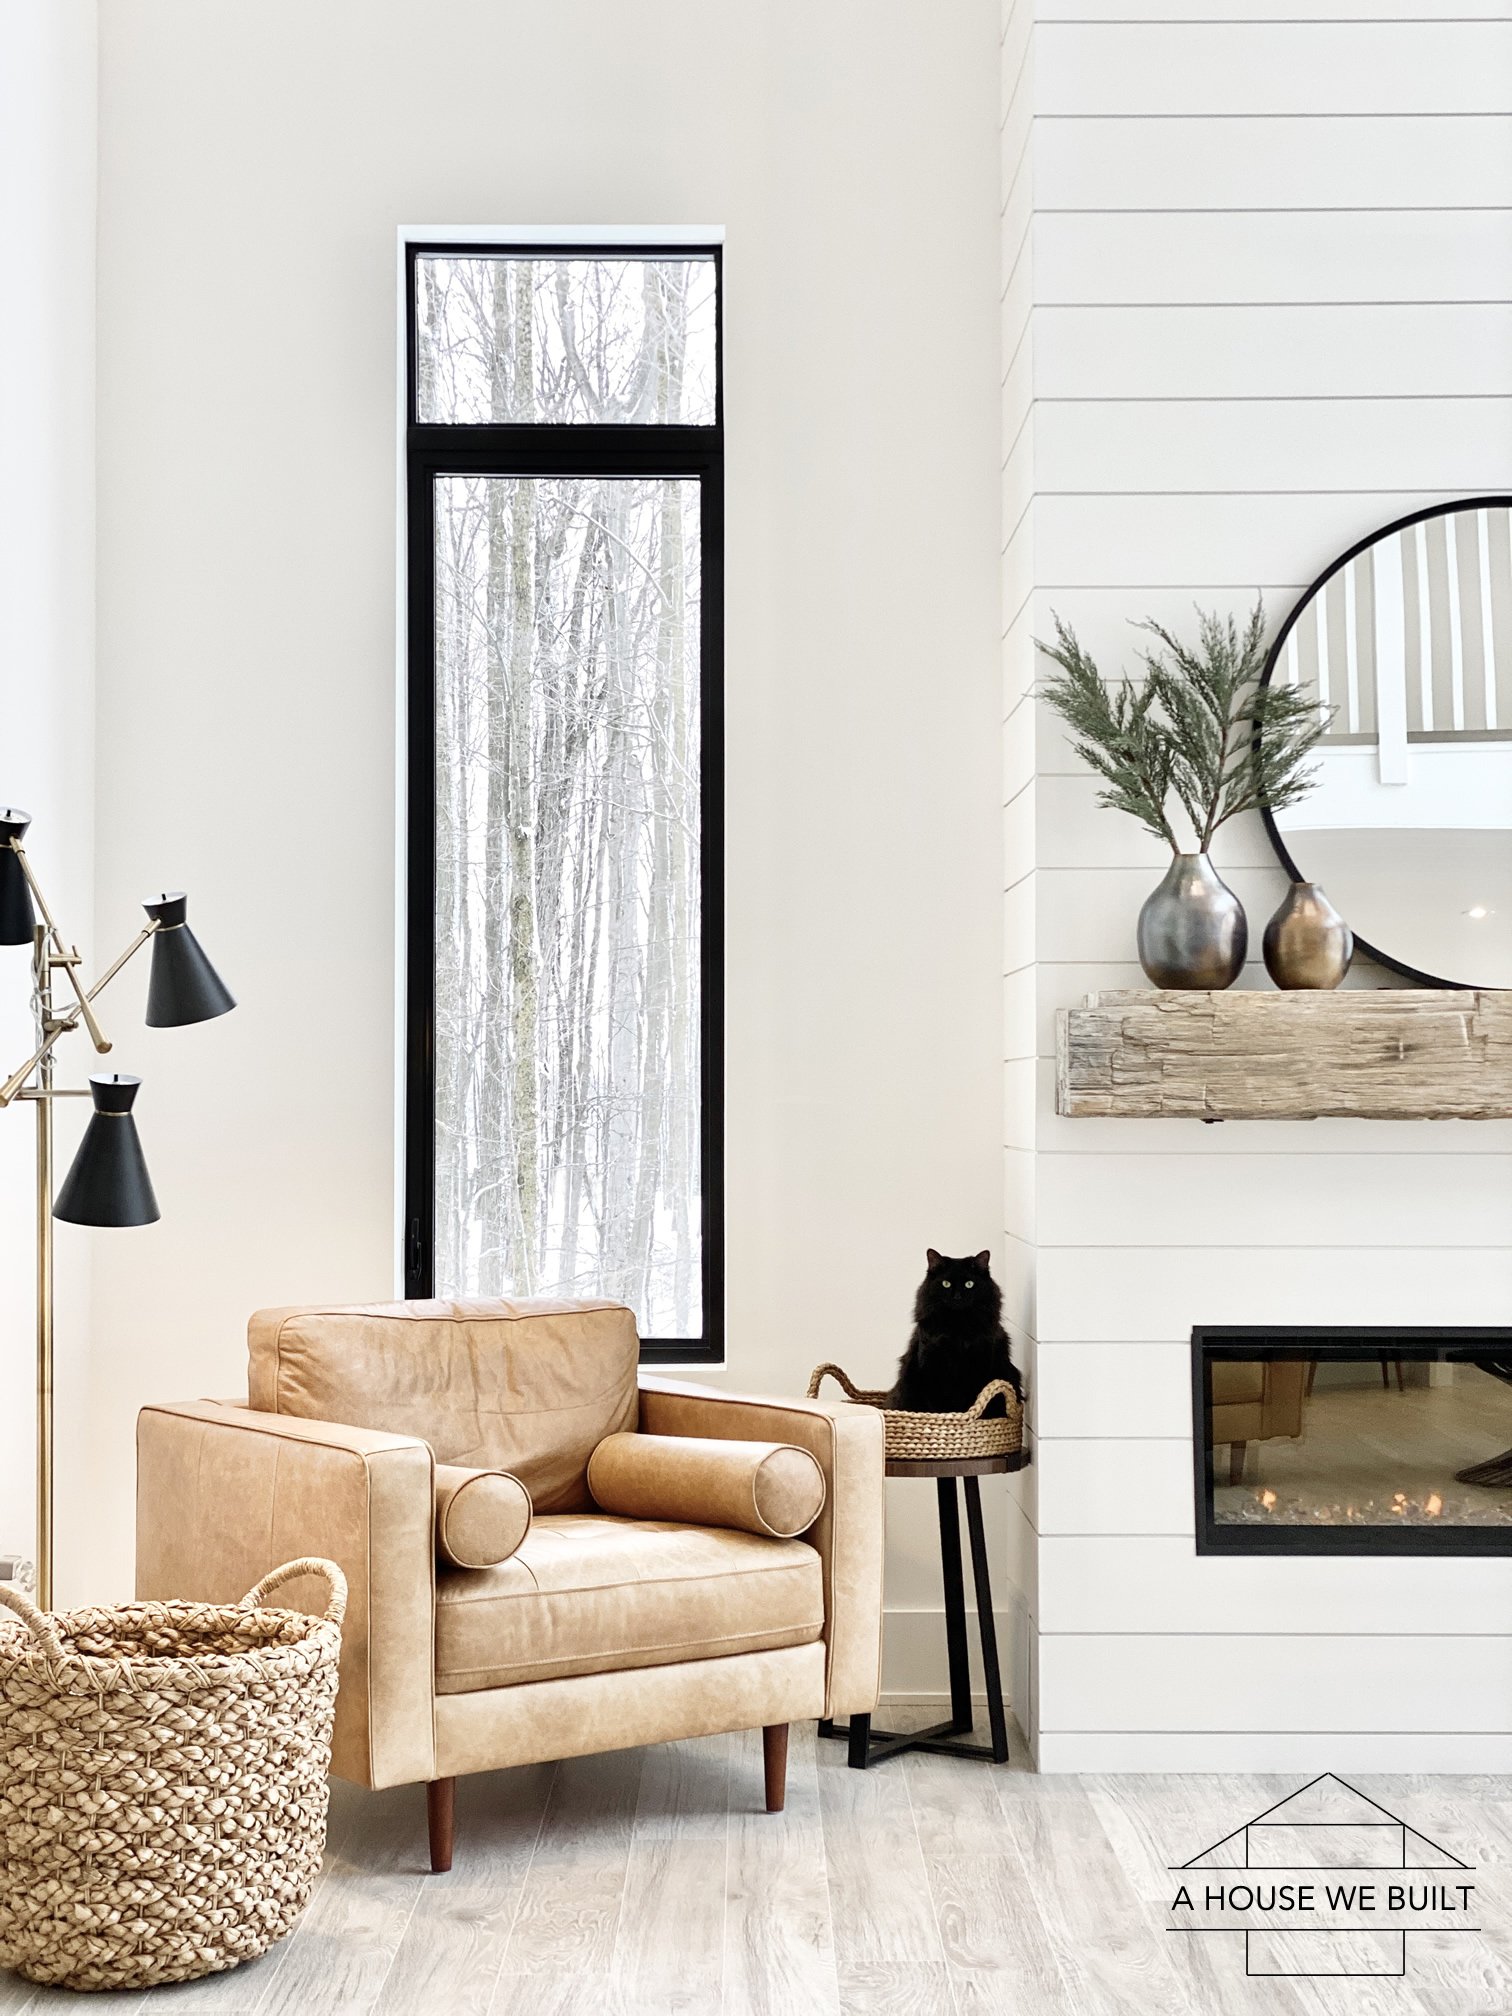
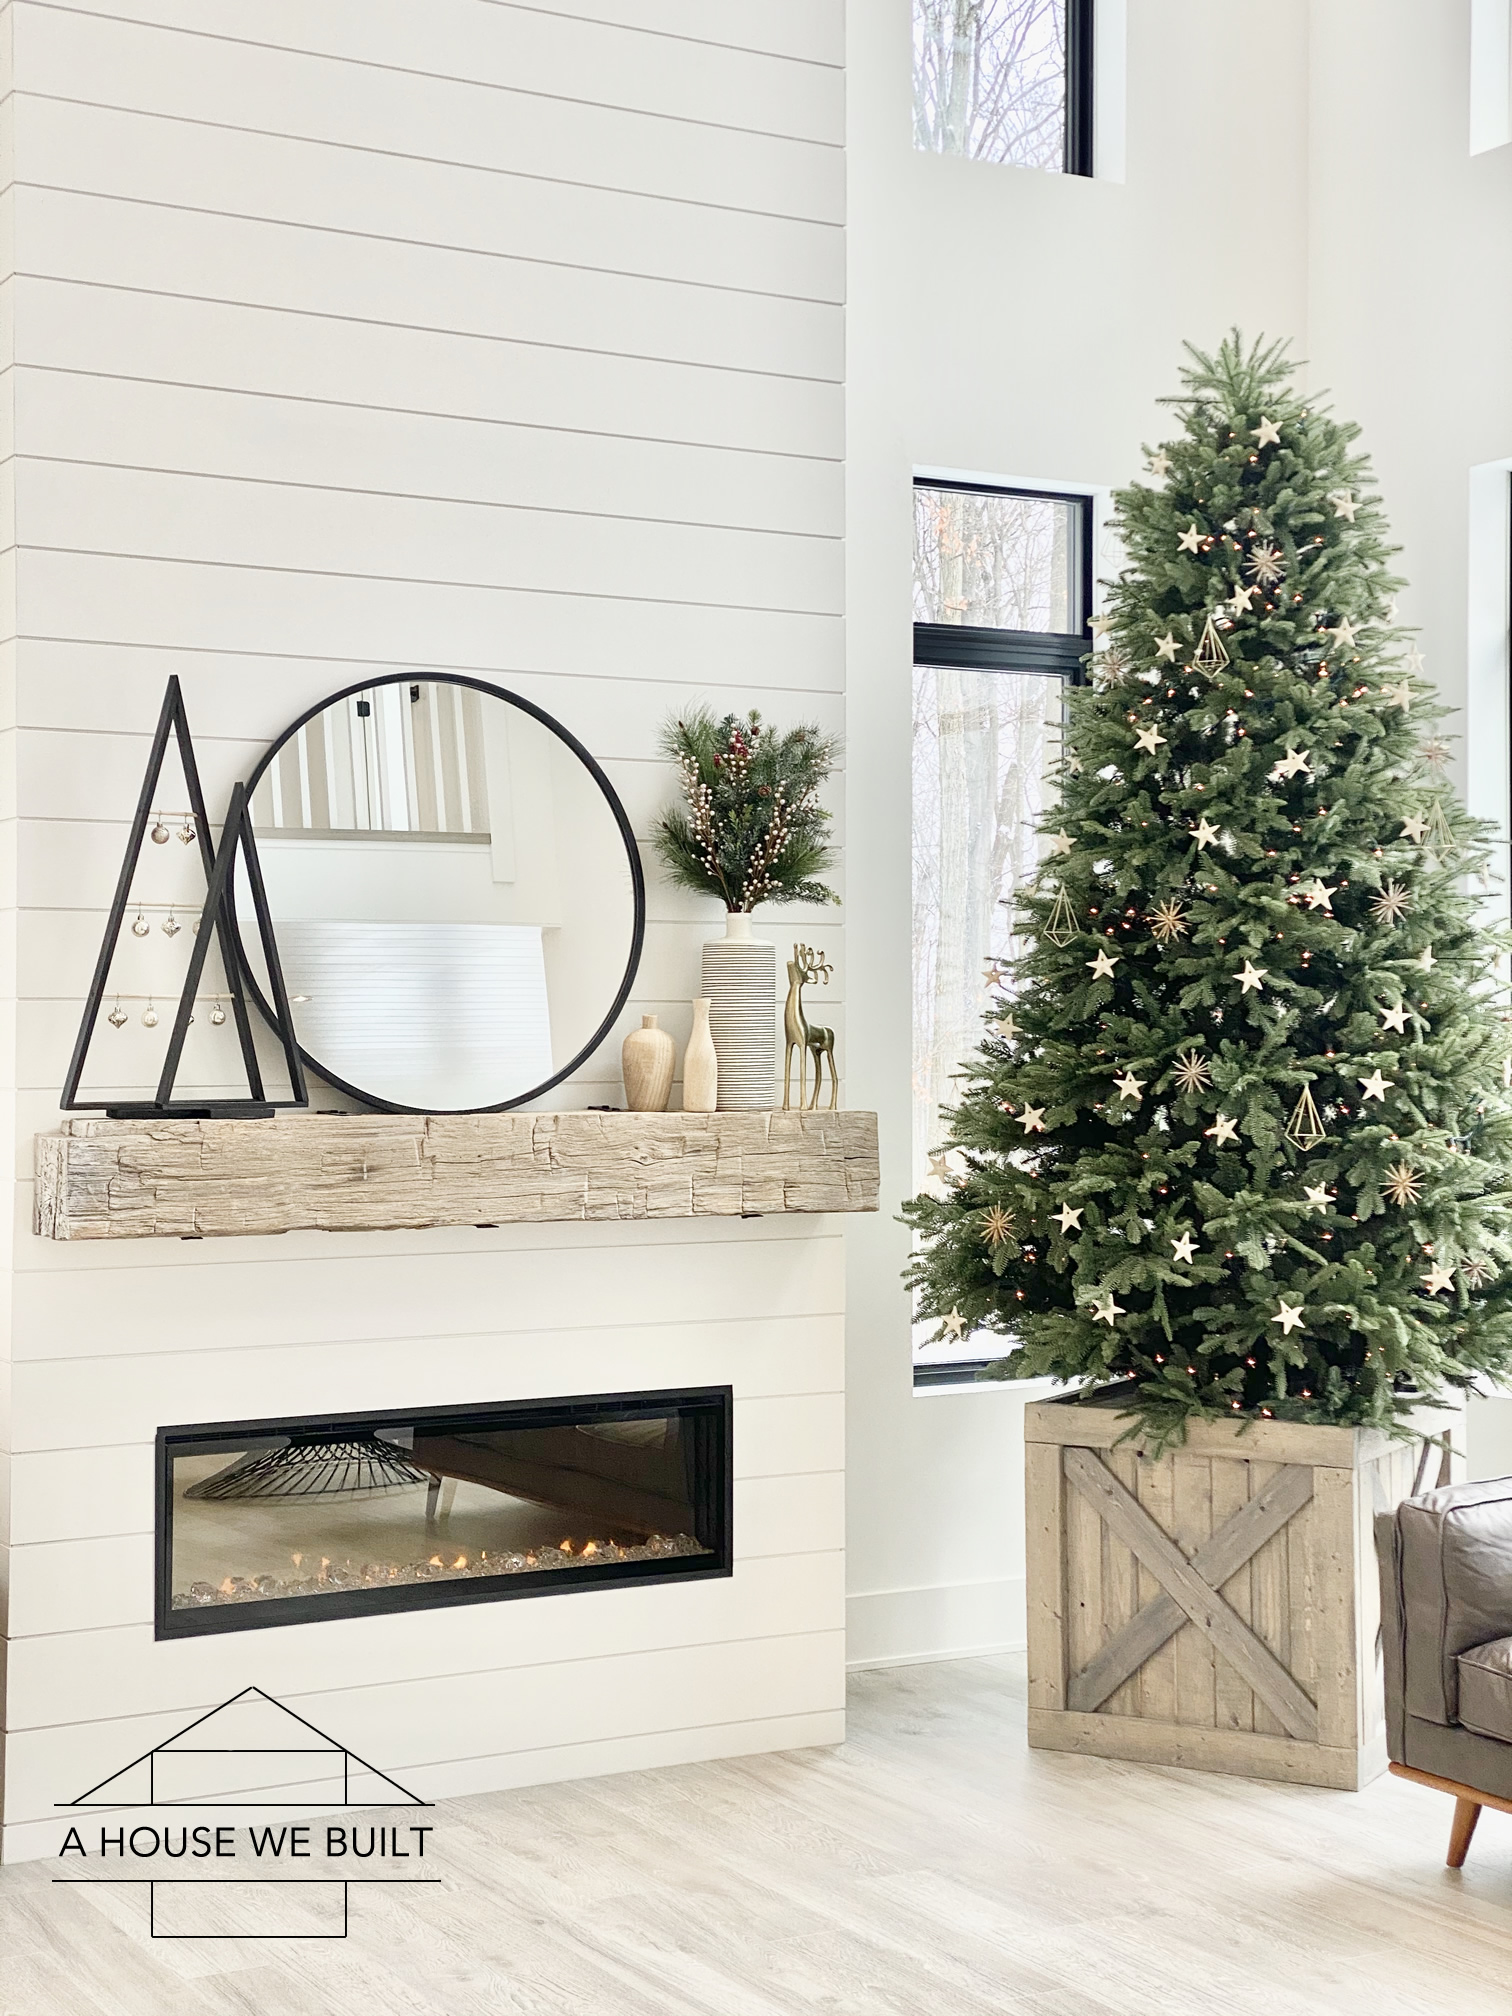
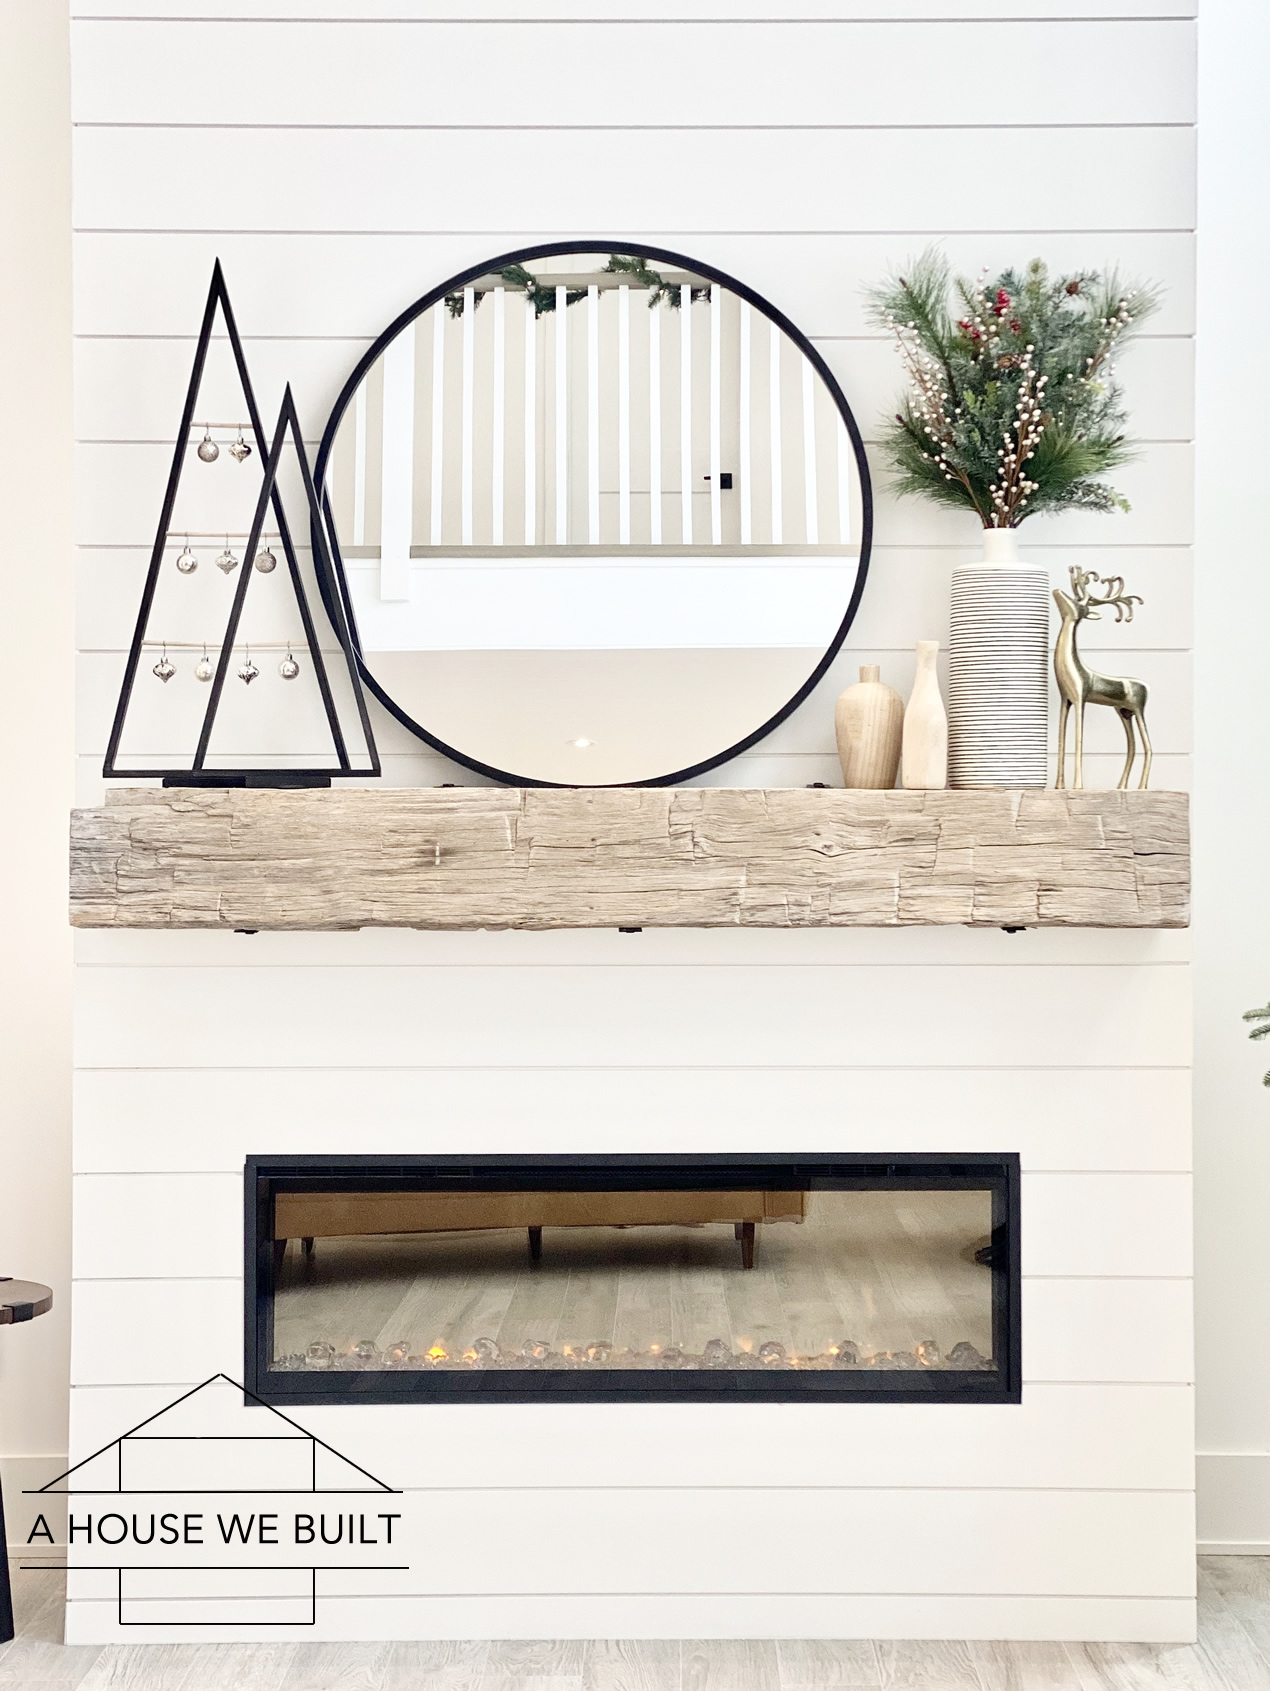
For our Christmas mantel decorations this year, I really wanted to try building some of the decor myself and I’ve always adored the look of minimal almost nordic-style wooden Christmas trees and also loved the look of these gorgeous black Crate & Barrel trees so I decided to try making some.

I wanted to play with the geometry of having two triangular trees beside my favorite big black round mirror (many sources, same mirror: Amazon | Wayfair | Urban Outfitters) so I decided to make my new DIY wooden Christmas trees with minimal black frames to reflect the same design direction as our mirror.

While I’ve done several woodworking projects, any angles (other than 45*) always made my head spin so these trees were a bit of a brain tangle for me, but I persevered and my little trees turned out just as I’d hoped! They’re not perfect, but they still gave me exactly the look I wanted! So here’s how I made them:

Materials list:

  • 1x2x8 board: Home Depot (the amount you need will depend on how many trees you make, I recommend getting a slightly “nicer” grade of wood for this project)
  • 1×4 board: Home Depot (you only need a couple feet of this for the base)
  • Wood dowel: Home Depot (you may only need one, or none if you don’t want to hang ornaments)
  • Miter saw, ours is like this: Home Depot (note: this is small enough a project that you could do all the cuts by hand using the next type of saw on this list, which you will need anyways)
  • Back saw: Home Depot (you could do all the cuts with this if you don’t have a miter saw)
  • Power drill: Amazon | Home Depot (you only need this if you plan to put in the dowel to hang ornaments from, and you’ll also need a bit that’s the same size as your dowels)
  • Wood Glue: Home Depot (if you use this, you’ll need clamps) OR Super Glue: Home Depot (if you get a fast enough drying one, you won’t need clamps)
  • Matte black paint: Home Depot (+ paint brush)
  • Sandpaper
  • Measuring tape

How to build them:

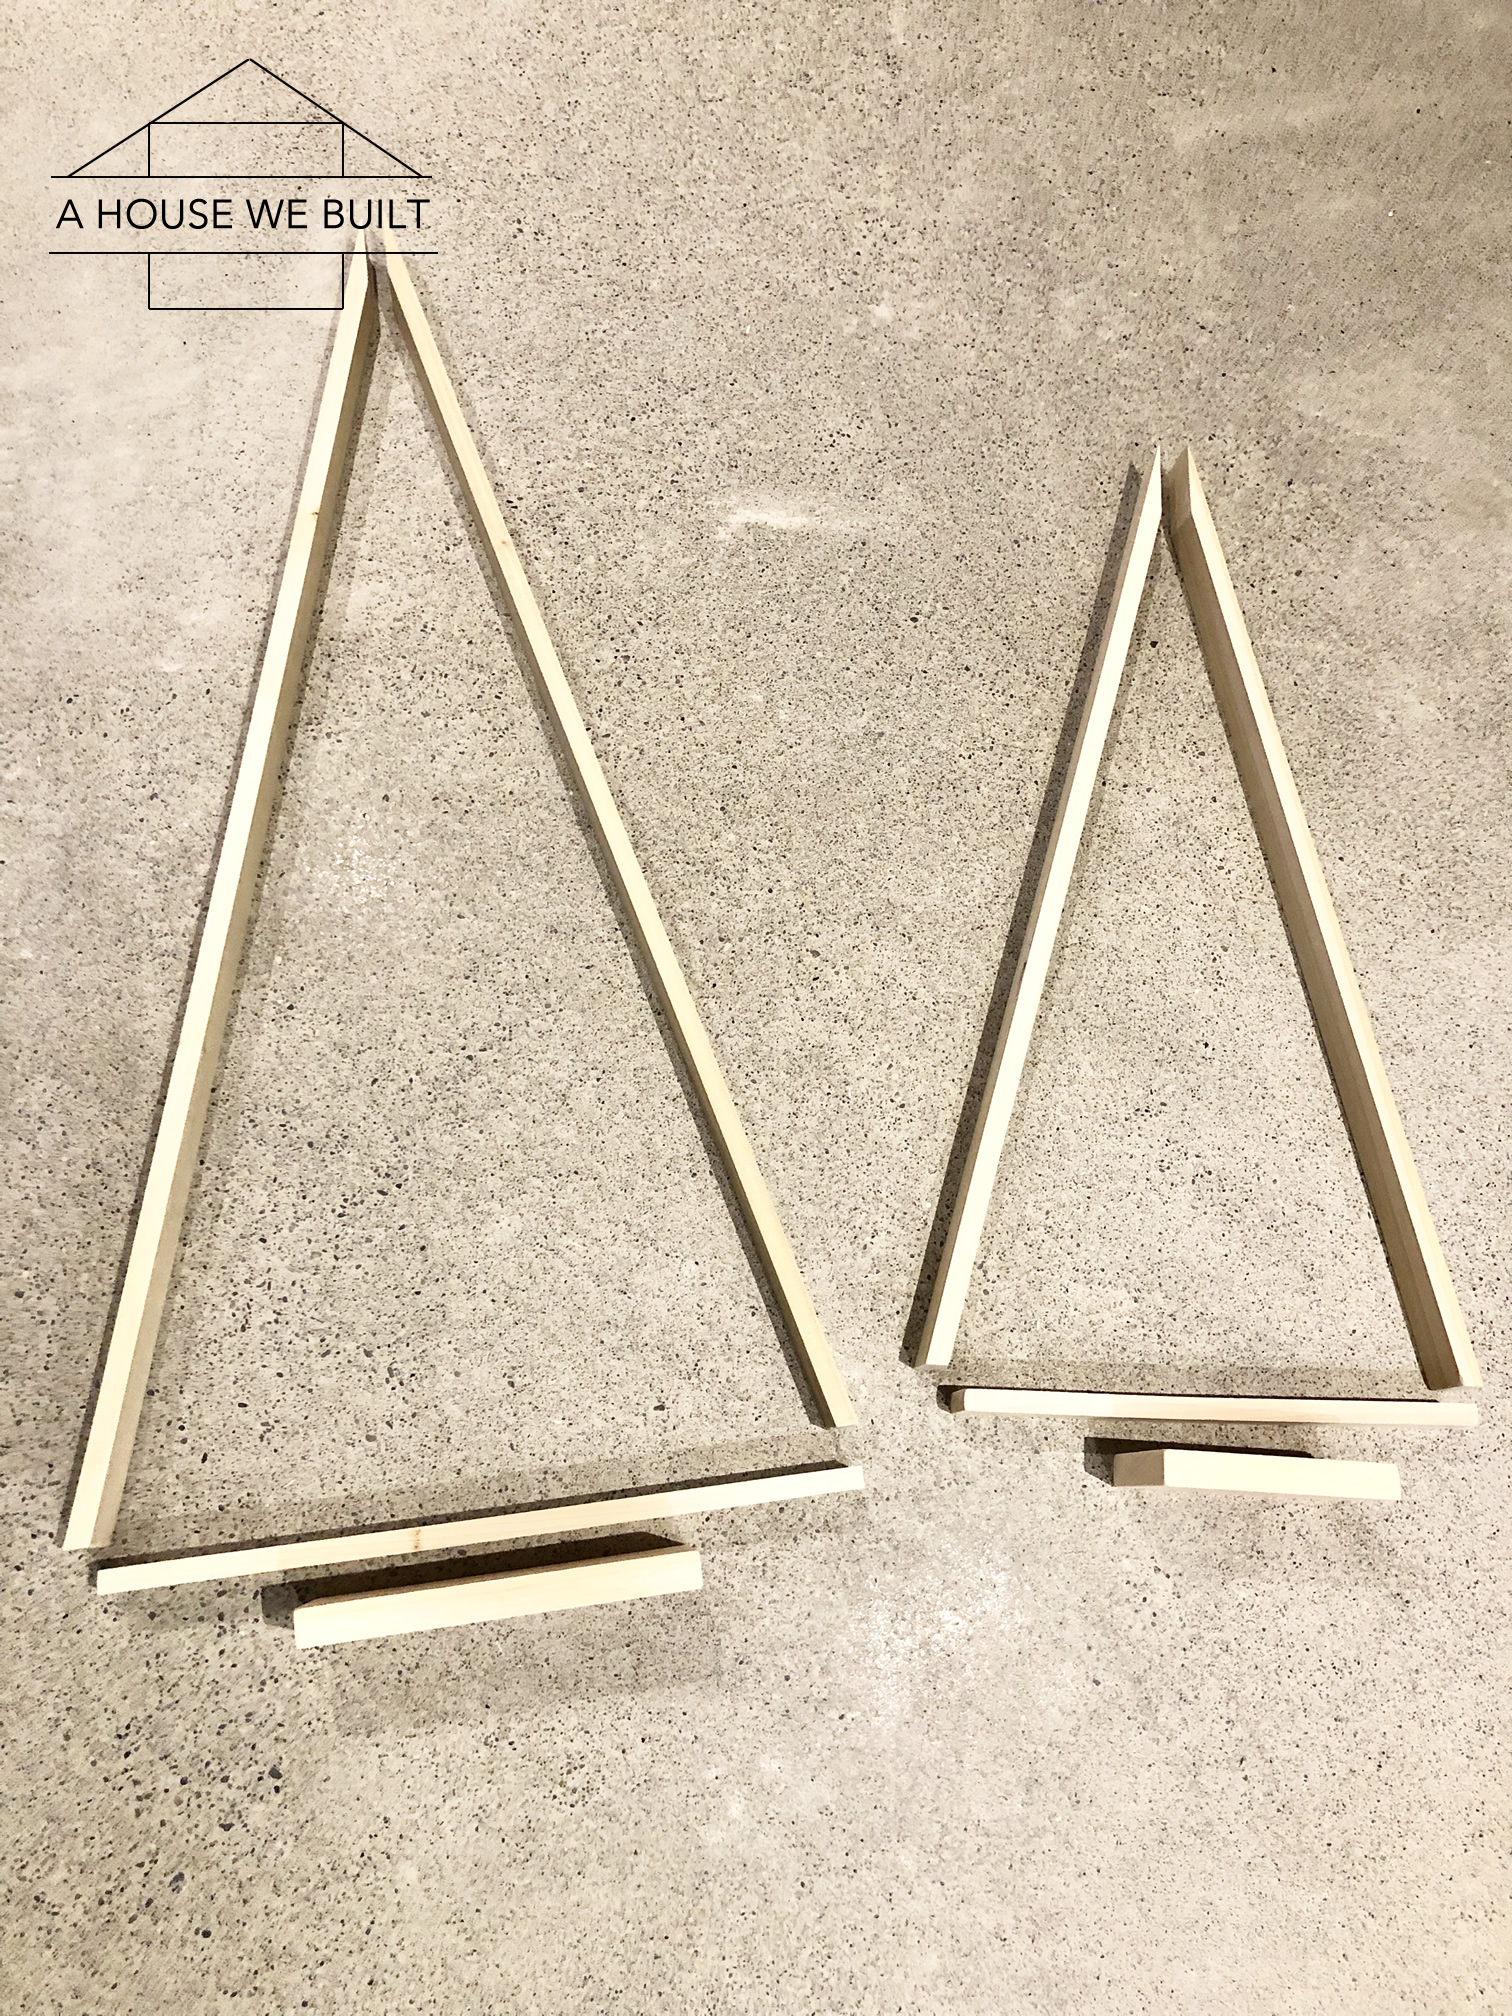
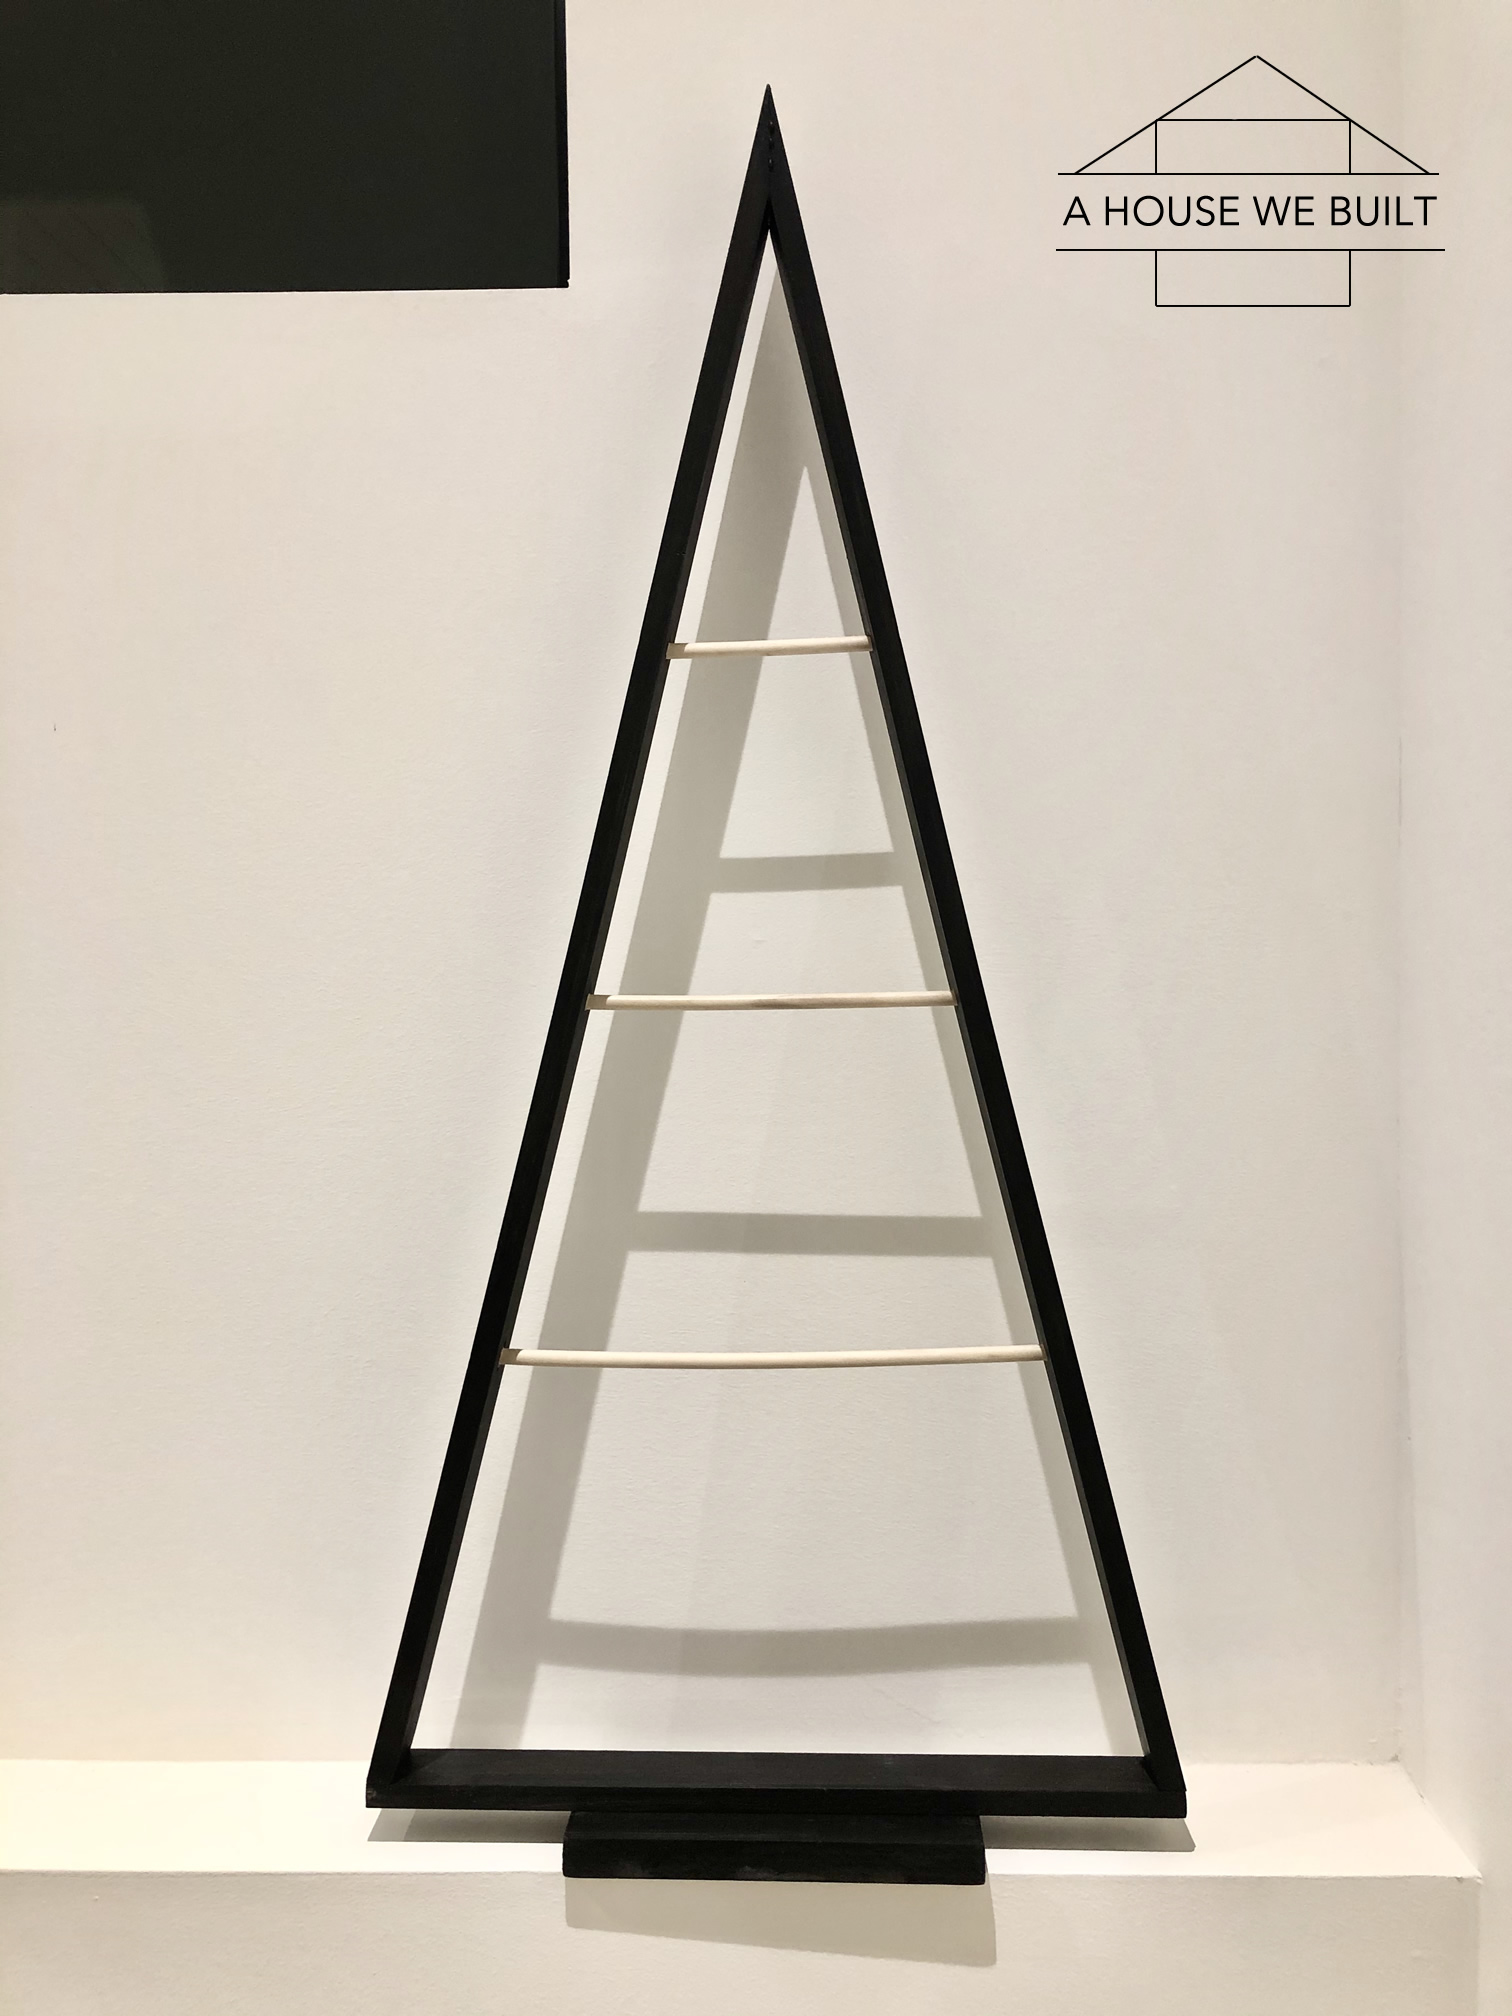
  1. Decide how big you want your trees to be. You can literally make them any size you want. For size reference, the smaller of my 2 trees has 26″ long sides, a 12″ bottom side, and a 5.5″ base plate.
  2. Cut your pieces to the right length: 2 long sides + 1 short side for every tree. Plus a wider bottom plate to stabilize it (to calculate the length of the bottom plate, just make it about 8″ shorter than the bottom side piece, 4″ on either side). If you want your tree to have the same angle as mine, then for the 2 long sides, back-cut the top 76.75 degrees, and the bottoms 13.25 degrees. But you could make your triangle wider, you just need to then calculate different angles. For the bottom side pieces, I actually didn’t do any angle cuts, I just left them straight because that’s how done with angles I was – don’t judge. To be fancier, you could do angle cuts on them if you want.
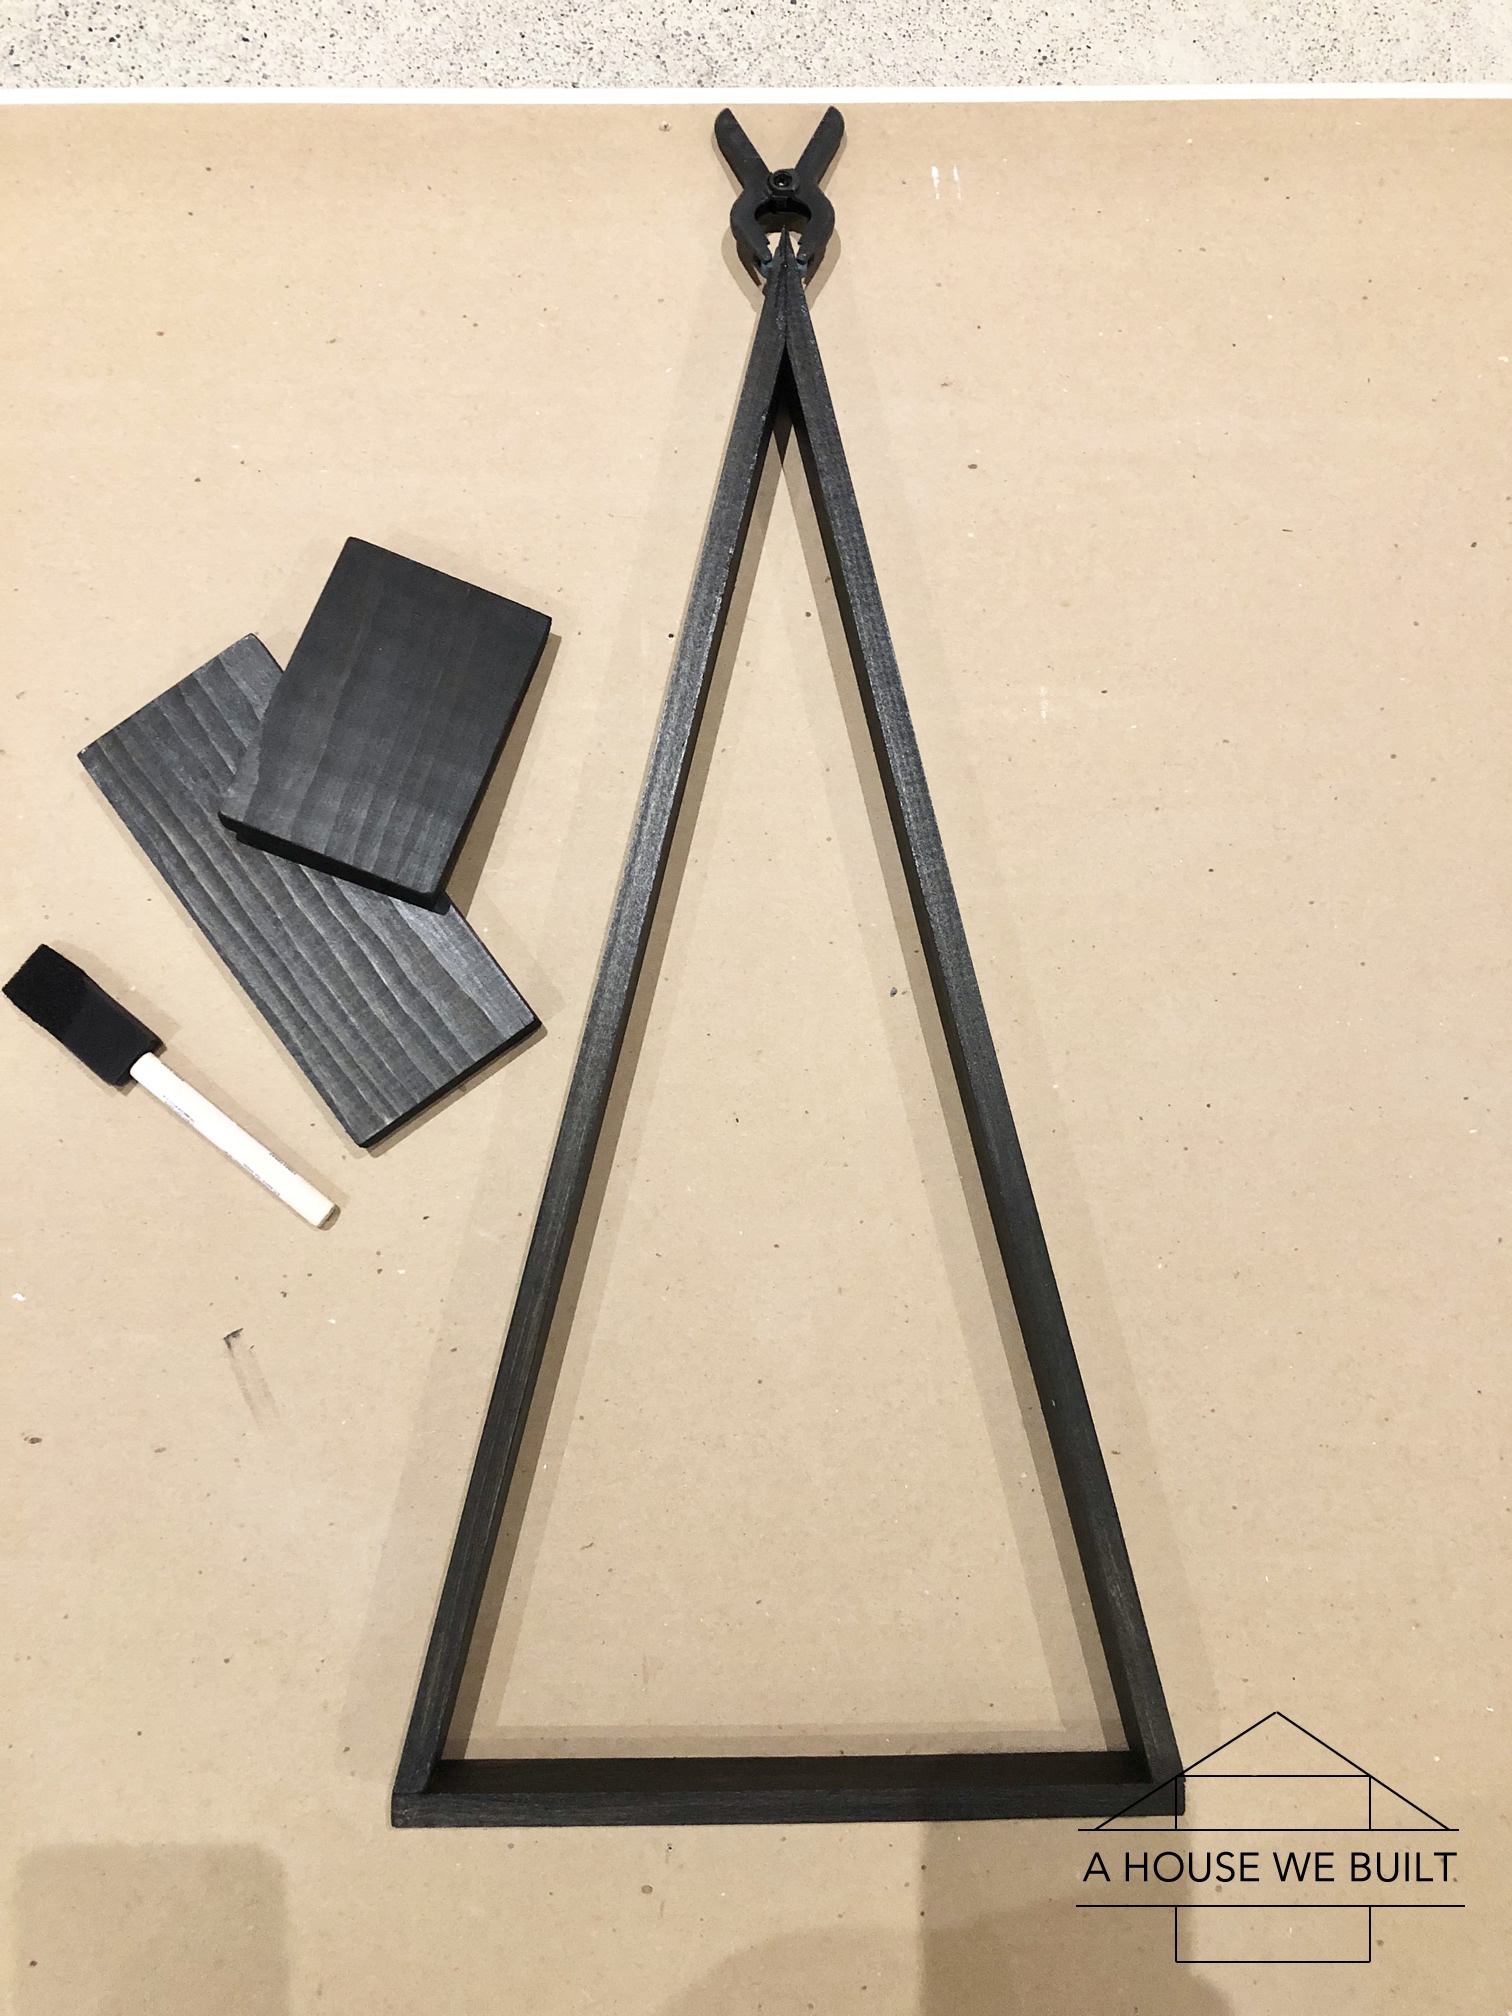
  3. You can leave your wooden tree natural if you want, or you can either stain or paint it. But whatever you choose, now is the time to paint/stain. I chose to paint mine flat black to match our mirror.
  4. Glue the pieces together. If you’re using a slow-drying glue, clamp them overnight. Note: you want to glue the 3 triangle pieces first, then once that’s dry, glue the entire triangle to the baseplate in the center/middle. I let my triangle dry overnight, then let the triangle dry to the baseplate the next night.
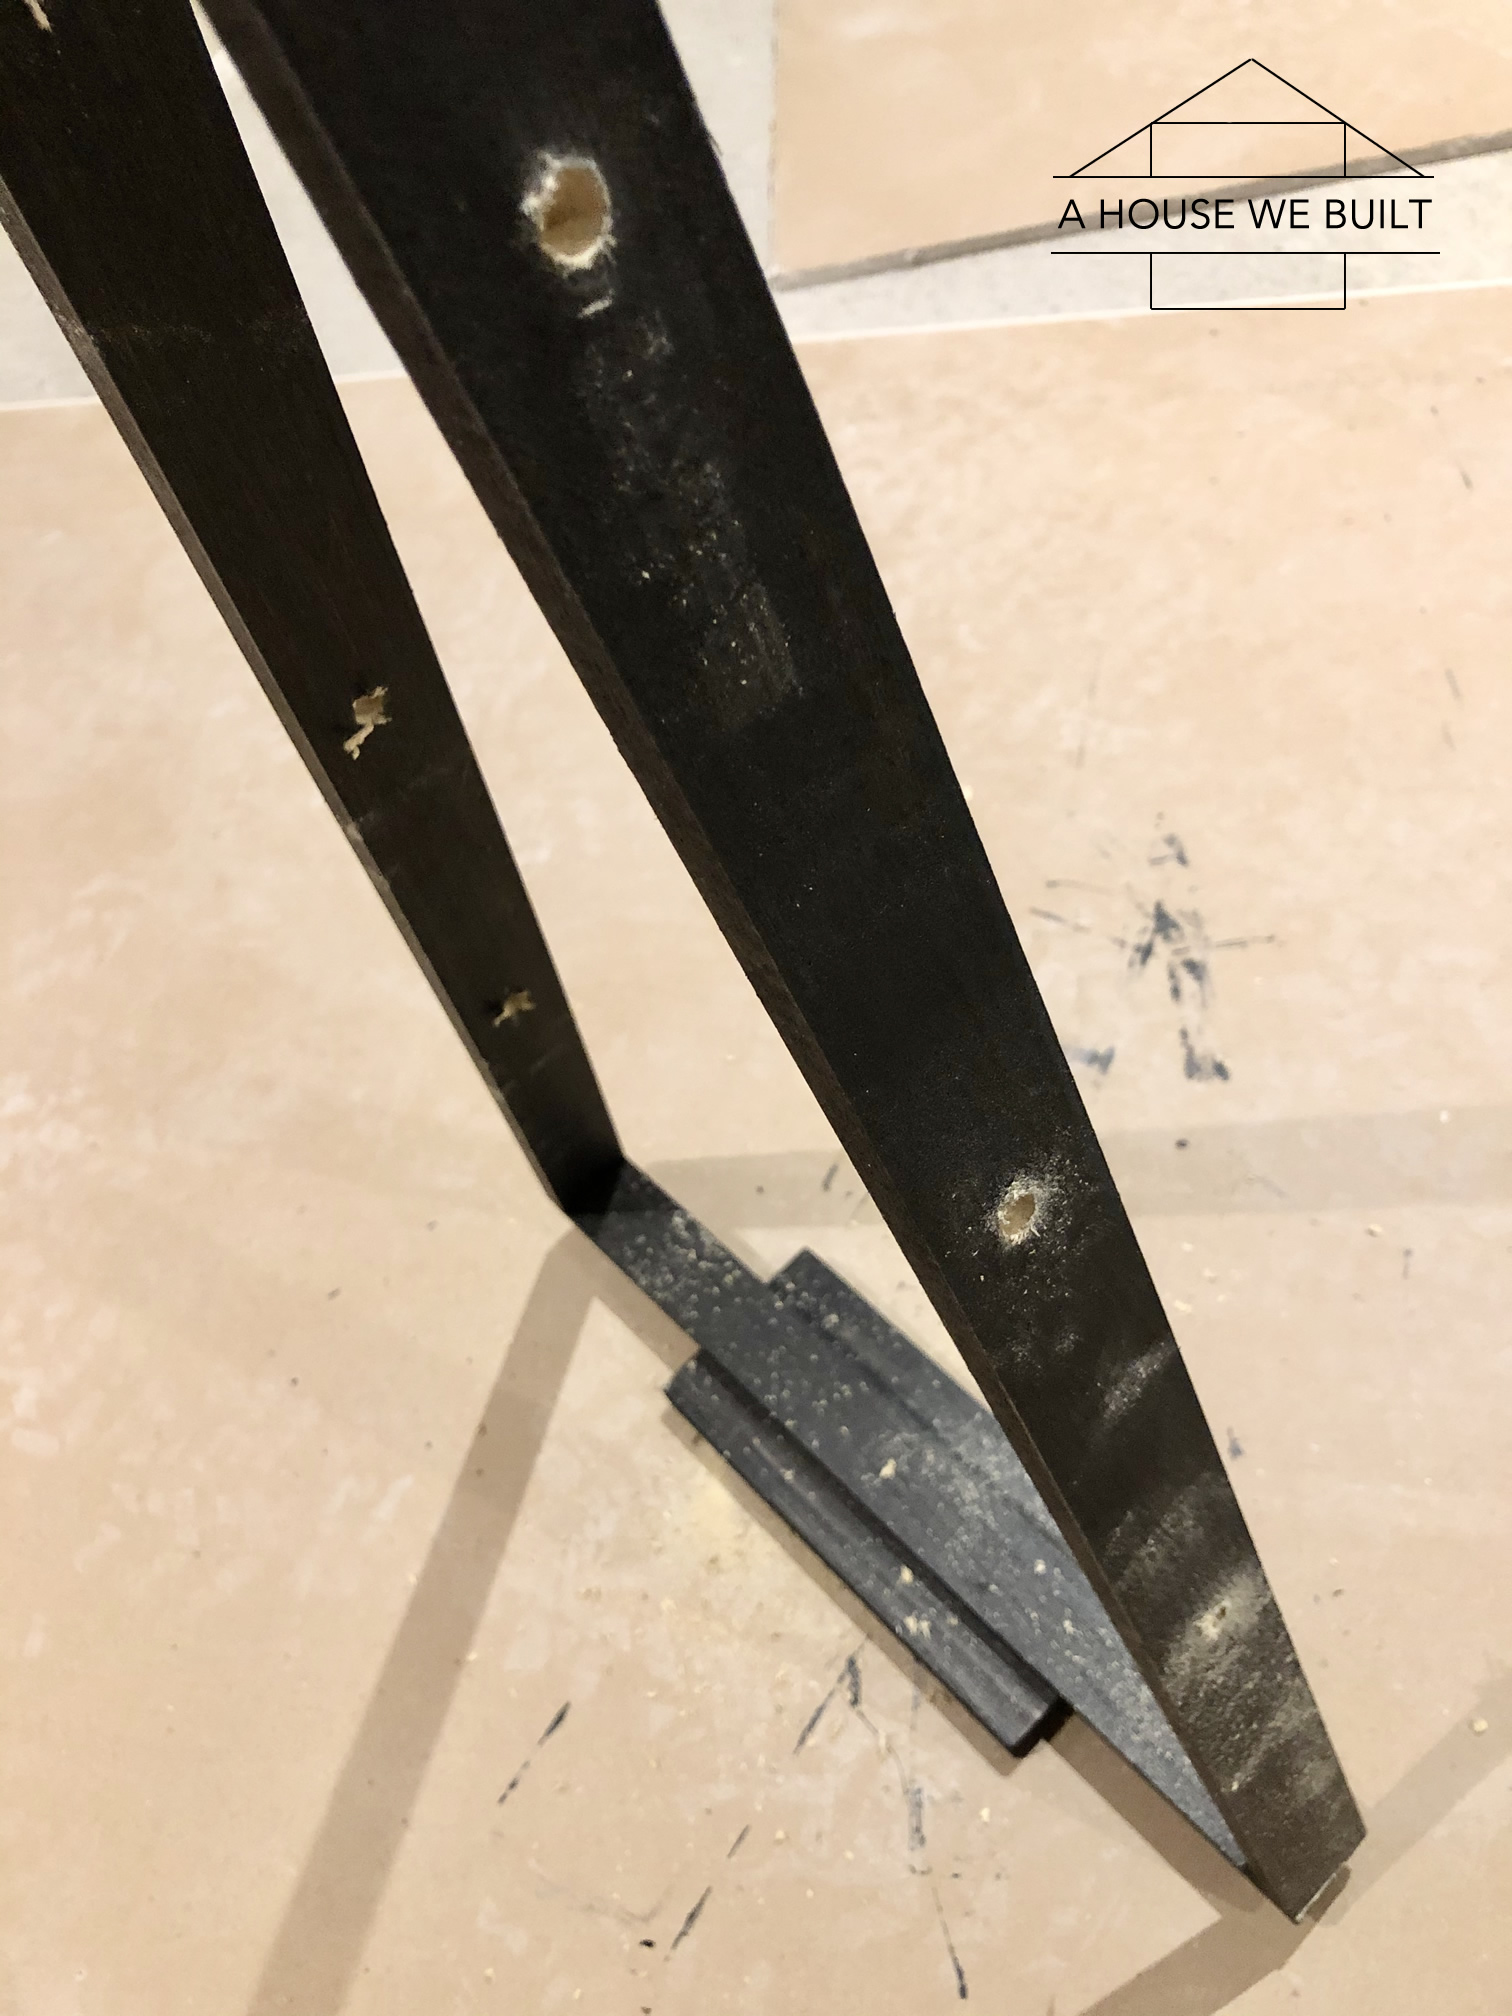
  5. If you want to add dowels to hang ornaments from, just choose where you want them and drill holes on both sides of the tree at the same place on both long sides. Make sure your drill bit is the same size as the dowel you’re using and make sure you drill the holes straight across so the dowel can go in one hole on one side and through to the other hold on the other side in a straight shot. I chose to do dowels on my larger tree, but kept my smaller tree more minimal with just the frame.
  6. Push the dowel through (I found that twisting it along helped) until it’s through on both sides.
  7. Use a hand saw to cut off the extra dowel. Remember to angle the saw same as the tree.
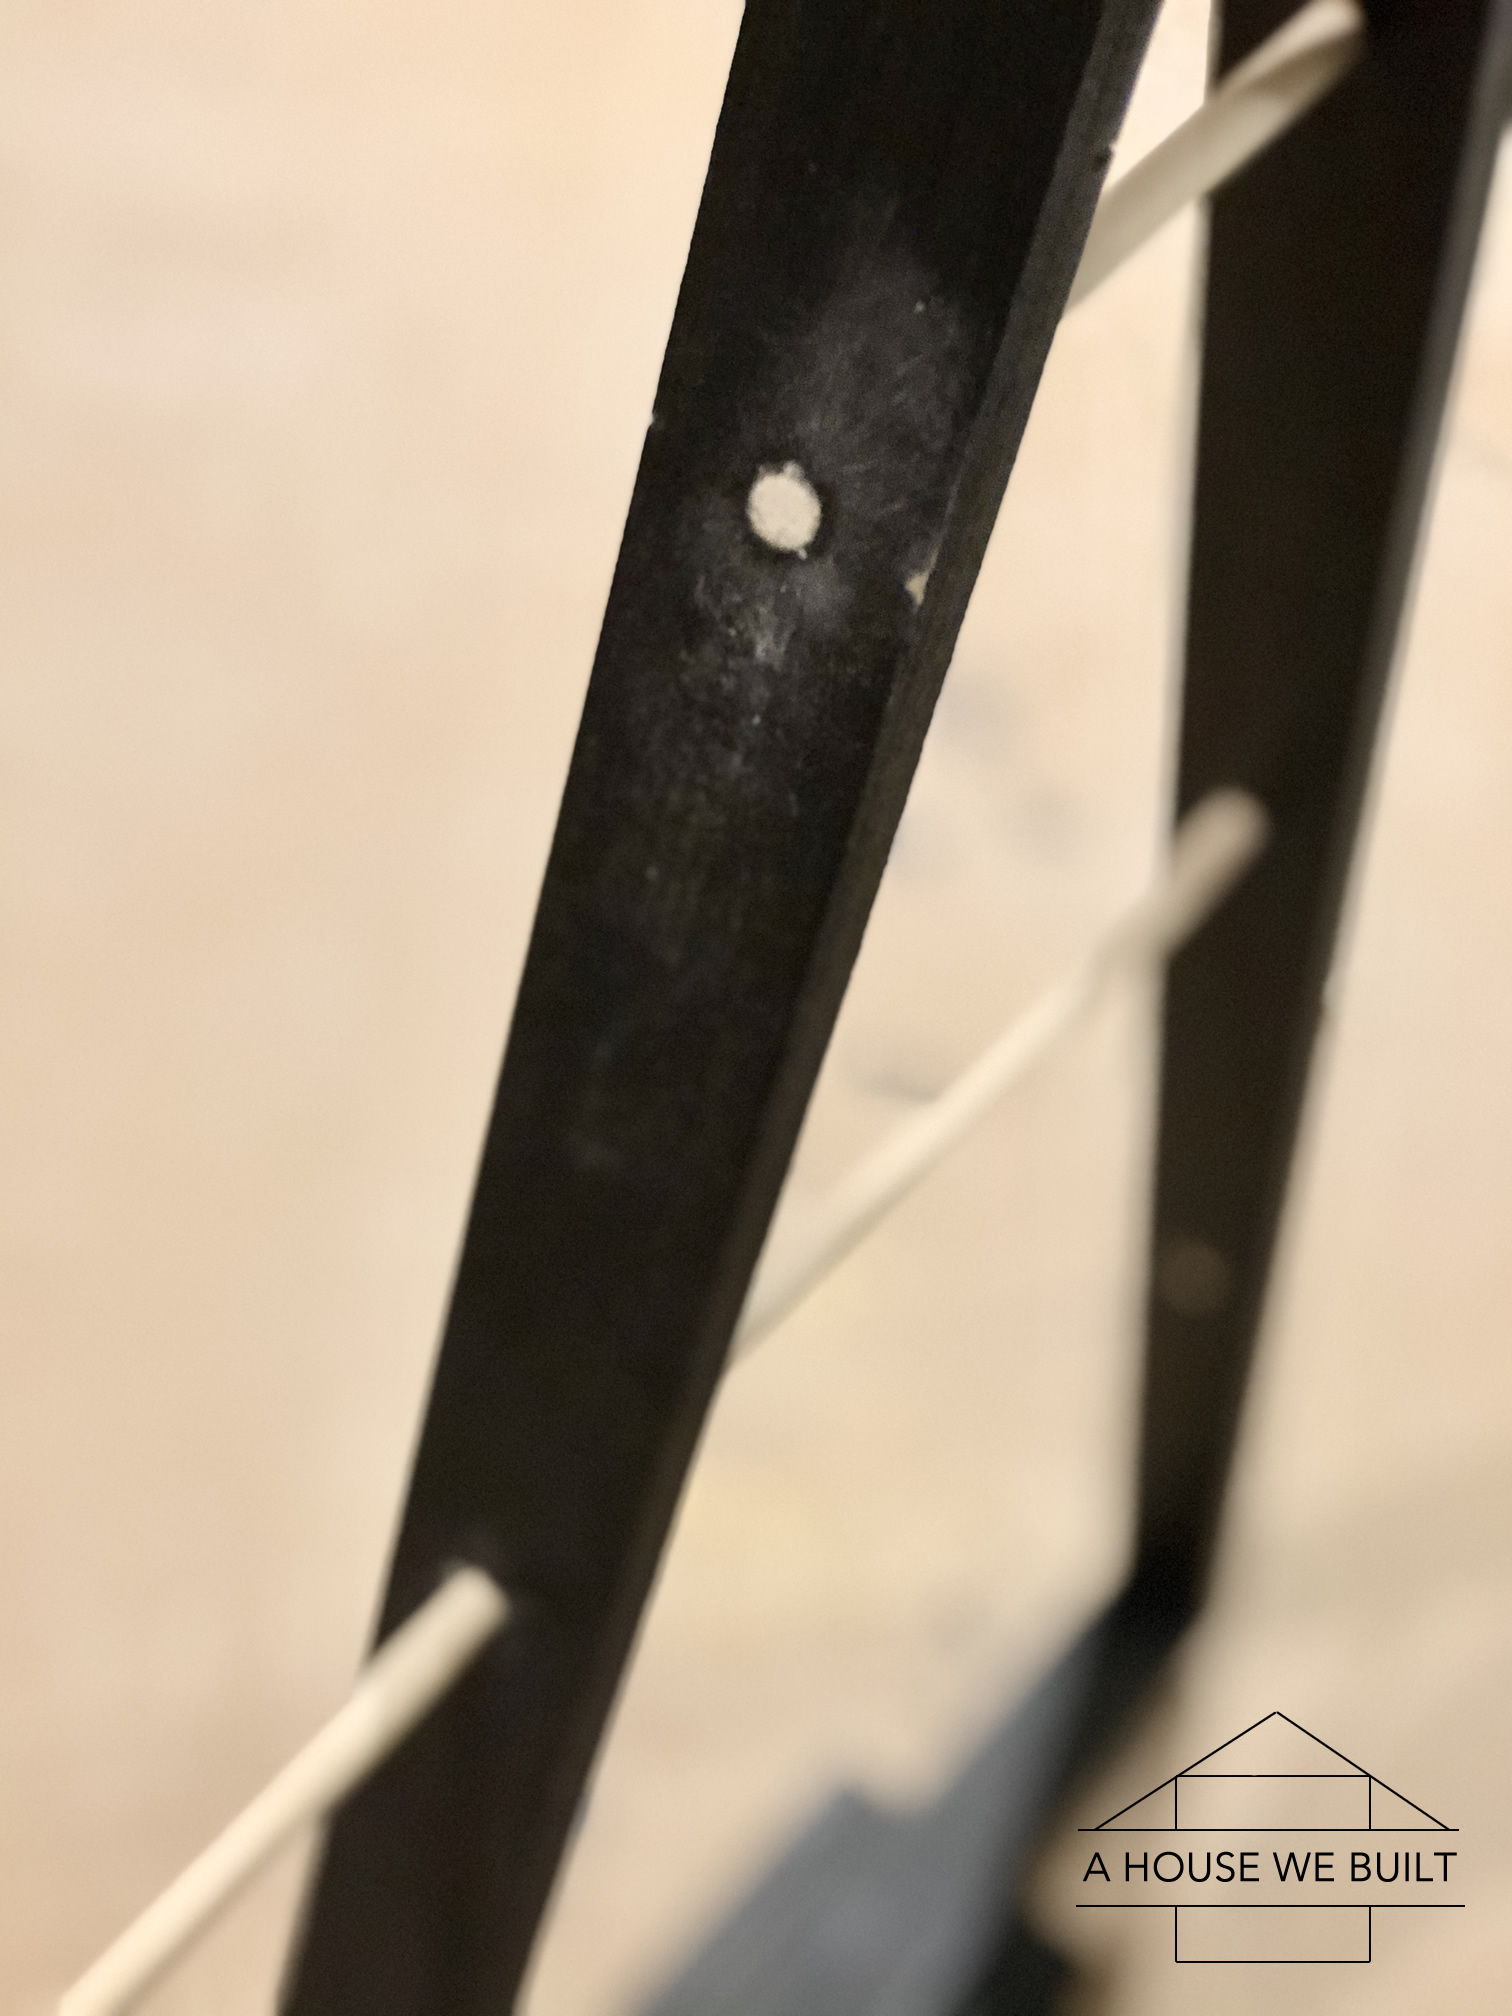
  8. Sand down the cut marks.
  9. Repaint the sides with an extra coat of paint. You can also paint the dowels if you want. I actually just left mine natural to minimize them, though I also considered painting them white.
  10. Hang ornaments and enjoy!

Below you can see both versions of the trees. I took the picture on the left the night I finished building the main trees, but before adding the dowels. Then I added the dowels to the big tree and took the pic on the right the following morning. Honestly, I like it both ways, with and without ornaments.

If you’re not super into DIY projects, then definitely check out these Crate & Barrel trees!

Filed Under: Christmas, Tutorials

How to DIY a Minimal Wooden Christmas Village

November 6, 2019 by admin 4 Comments

This is one of the simplest little DIY projects ever because there are almost no rules to how you make these minimal little Nordic-inspired wooden Christmas Village houses and trees and they are super cute!

For the wood, you can literally just use up whatever scrap 2×4, 2×6, 2×8, 2×10 2×12 pieces you have (or even 4x’s)- or if you don’t have any, just buy framing lumber at a hardware store – it’s super cheap!

Once you have your lumber, make sure there’s one fully flat bottom side cut at 90 degrees. Then you can leave as much room as you want for the body (though I recommend staying under 10″ of total height so they don’t easily tip over) and simply cut the top side to whatever angle you want. And that’s literally it!!!

The top angles don’t have to be perfect or even symmetrical. If you want a perfect peak, just mark the middle of the wood, then cut each side back at 45 degrees. Honestly, I eyeballed most of my angles.

If you want to add little Christmas trees to the houses you’re making, just cut some of the wood pieces into a sharp triangle to make the basic 3-sided shape of a Christmas tree. You can do all sorts of sizes.

I used our miter saw to cut the wood (ours is like this: Home Depot) but if you don’t have one, and don’t mind putting in a little more work, you could do this all by hand with a back saw (Home Depot) too.

When you’re done cutting up the pieces, just sand the edges a little so that they’re smooth to the touch.

From that point you can either leave them natural like I did, or stain them, or paint them, or decorate them, or literally do anything you want to them! If you want to stain them, I’ve listed my personal favorite stain color down below (it’s the stain that I used on our dining table, console table, and Christmas Tree box):

  • Pre-stain conditioner: Amazon (don’t skip this step!!)
  • Gray stain (one coat): Amazon
  • Matte top coat: Amazon

If you cut up a whole bunch of little houses and tree shapes in advance, then painting them can be a fun family (or friends) holiday activity to do together too! It’s like carving pumpkins but for Christmas 😉

If you prefer the idea of buying Christmas village houses instead of making them, I love the look of these ones:Bed Bath & Beyond | Crate & Barrel.

For more sources from our mudroom, click here.
For more of our DIY tutorials, click here.
To explore the other rooms in our house, click here.

Filed Under: Christmas, Tutorials

Healthy Hearty Salad Recipe

November 5, 2019 by admin Leave a Comment

If you’re looking for a healthy, hearty, filling salad that you can make in advance, that will last for several days in your fridge, and that’s filled with nutrients, then you’ve come to the right place!

I make a huge batch of this salad almost every weekend (usually at least 3 times a month) and it’ll last through the middle of the week. It stays fresh because the ingredients used in it are all ones that are not only totally fine to store in the fridge for a few days, but most of them just get even tastier with time.

That’s why this salad is loaded with veggies that all keep very well, but there are no ingredients like avocados, lettuce, and tomatoes (for example) because they don’t last well once prepared.

The logic behind this salad is to give yourself something healthy that is just sitting in your fridge waiting for whenever you get hungry. I like to call it a “bowlful of health” because it’s literally a combination of some of the most nutrient dense and healthy foods that it’s possible to eat. Plus, it tastes delicious and it’s also filling and satiating thanks to the grains and proteins. Having something pre-prepared and easy to serve like this makes snacking on unhealthy foods much less likely because you can just grab this and go!

Essential veggies (add all of the following, unless you don’t like one of them):

  • 2 heads of kale (de-stemmed and chopped finely)
  • 2 bunches of curly parsley (de-stemmed and chopped finely)
  • 2 bell red/orange/yellow peppers, chopped into small pieces
  • 2 large cucumbers, chopped into small pieces
  • 1 medium red/yellow onion, chopped into small pieces
  • 1/2 small red cabbage, chopped into small pieces

Optional veggies:

  • 1-2 celery stalks, chopped into small pieces
  • 1 medium carrot, chopped into small pieces

Grains (add at least 1 of the following, though I recommend adding 2 of them. If you’re going to just add one of them, then I would recommend you double the amount to 2 cups):

  • 1 cup cooked quinoa
  • 1 cup cooked barley
  • 1 cup cooked wild rice

Proteins (add at least 2 of the following):

  • 1 can lentils (drained & rinsed)
  • 1 can chickpeas (drained & rinsed)
  • 1 can beans (drained & rinsed) *my favs are black and kidney

Dressing (mix the following ingredients together in a bowl then pour over salad & stir everything together):

  • Juice of 2-3 lemons/limes
  • As much olive oil as lemon/lime juice
  • 1 tsp balsamic vinegar
  • 1 tsp garlic powder
  • Little squeeze of honey
  • Salt & pepper to taste (I like a lot of both)

Note about the dressing: if you prefer using fresh garlic, you can substitute 1 clove of garlic for the garlic powder, but then you’ll need to blend it in a high-powered blender like a Nutribullet (Amazon).

Store it in the fridge in an air-tight container. Usually lasts about 3 days.

Sources from these pics:

  • Pantry container: Amazon | Bed Bath & Beyond
  • Vase on kitchen island: Crate & Barrel
  • Bottle brush trees (similar): Crate & Barrel | Crate & Barrel
  • Long matte black drawer pulls: Amazon | Similar: Schoolhouse
  • Short matte black drawer pulls: Amazon | Similar: Schoolhouse
  • Kitchen faucet: Moen Align (Wayfair)
  • Soap dispenser: Moen (Wayfair)
  • Kitchen sink: Blanco (Wayfair) linked to our color
  • Nutribullet blender: Amazon | Bed Bath & Beyond
  • Dining table: we built our table (see plans), but here are some very similar options: Wayfair | Wayfair | Pottery Barn | Pottery Barn | Hayneedle | Overstock | Overstock | McGee & Co

Filed Under: Recipes

Oatmeal Raisin Cookies Recipe

November 4, 2019 by admin Leave a Comment

These are the best oatmeal raisin cookies ever! They’re quick and easy to make, and they’re sinfully addictive and delicious. Really, there’s not much more to say about them so I’ll just jump right into the recipe.

You can make everything in one bowl if you assemble the ingredients in the exact order I say below. I literally just use a dinner fork to mix it, and 2 soup spoons to spoon them onto the cookie sheets so all you need in terms of supplies are:

  • 1 large/medium mixing bowl
  • 2 large cookie sheets
  • 1 dinner fork
  • 2 dinner spoons

Preheat oven to 375.

In your mixing bowl, do the following:

  1. Add 2/3 cup melted butter or sunflower oil and 1 cup light brown sugar.
  2. Mix until combined.
  3. Add in 1 egg, 2 tbsp water, 2 tsp vanilla.
  4. Mix until combined.
  5. Add in 3/4 cup flour and 3/4 tsp baking soda.
  6. Mix until combined.
  7. Add in 3 cups large flake oats and 2 cups raisins.
  8. Mix until combined.

Spoon the mixture onto cookie sheets into balls that are about 1 inch in diameter. Don’t worry about making it perfect. They flatten as they bake so just get them onto the sheet.

Bake at 375 for 12-14 minutes (13 in my oven).

They will still be a little soft when you take them out but as they cool they’ll firm up.

Enjoy!

For related sources from our house, go here:

  • Kitchen Sources Page
  • Pantry Sources Page

Filed Under: Recipes

Cat Room Tour & Litterboxes

October 26, 2019 by admin 21 Comments

Although our cats have free run of our house all day long, we created a “cat room” where they spend their nights (when we’re either sleeping or away). Their cat room has fresh water and food, a litter box, beds and boxes, scratchers and toys, and everything they love. They all love this room and going here at night has become a part of their routine – they actually go to it of their own accord at night when I call for them.

WHY WE HAVE A CAT ROOM.

When we first moved here, I wanted to help our furry family members acclimatize to our new home so we turned a spare room into a “cat room”. This created a contained environment with all their favorite things to give them a place that smelled and felt familiar to them. For the first day after we moved here, I kept them in this room only to familiarize them with the sounds/smells of our new home without being overwhelmed. Then every day after that I’d let them out short time (with supervision), increasing the time each day to expand their comfort with the new house while giving them a safe, familiar space to return to (which they often did) if they needed reassurance. After about a week, they were fully acclimatized and we gave them free run of our house during the days, though we still return them to their cat room each night.

Since they loved their cat room so much, I decided to keep it set up up as “their” space and I always put them in here at night and/or if we go out (which is rare considering we work from home) because when they’re in their cat room, I know they’re in a safe environment. This also means they can’t get into anything they’re not supposed to when I’m not around, reinforcing our house cat rules and training methods.

Every time I put them in their room (usually at night before bed), I also always give them their soft food at the same time so they love the routine of going to the room and it’s always a positive experience.

NOTE 1: If you are adopting new kittens/cats, keeping them in a separate room for the first day(s) this way is also a good idea. Ultimately the idea is to slowly introduce the new element (whether its cats/kittens to a house, or a house to cats/kittens) to make the transition smooth and stress-free. More details here.

NOTE 2: I did not “decorate” this room — the cats decorated it in a sense because they chose all the things inside it. So I didn’t try to make it look pretty, I just kept it full of all the things they love most.

LITTER BOXES.

This is the litter box we have: white version: Amazon | dark grey version: Amazon | pearl version: Amazon. This litter box style is small, minimal and simple, domed to contain litter spray, and very easy to clean.

  • We have one litter box on every floor of our house. It’s very important that litter boxes be easily accessible for the cats (the easier to access, the great chance of preventing accidents) so be sure it’s placed somewhere logical, consistent, and easy for them access. The general rule should be one box on each floor, unless you have a ranch home, then maybe do a few around the house.
  • I clean all the litter boxes once a day. Since I scoop the boxes out daily, it takes less than 30 seconds to clean each box. I use a self-clumping litter that sticks to their business as soon as they do it and also eliminates any odor. Ultimately, the cleaner you keep the box, the less odor there is. I don’t use self-cleaning/robot boxes because it’s so easy to clean them in person and also, in my opinion, the litter boxes I chose are visually prettier and more minimal, and also much smaller.
  • I don’t try to hide them. Yep, you read that right. I just tuck them into corners where they won’t be noticed. Again, it’s very important that cats are easily able to find their litter boxes, so I keep them easy-to-access and unhidden. I’m not sorry or ashamed of them. The simple fact of life is that everybody poops, even cats. I don’t hide our bathrooms, so I also don’t hide theirs. My way of visually minimizing them is by choosing such a simple and dare I say “pretty” style of litter box (this is the style we have: Amazon) that is both small and a similar color to our walls.

FOOD AND WATER.

We feed our cats an allergen-reducing kibble called LiveClear (link: Walmart | Petco). We have 5 cats and also have cat allergies, so this is one of the many ways we reduce allergies. More details here.

We keep fresh water and bowls of dry kibble always available for them both in their room, and also on the main floor of our house. I free-feed them dry kibble because, since they’ve never known what it’s like to go hungry, none of them overeat and none are territorial around their food.

They also have a continuous water fountain (Amazon | Walmart) in our mudroom – I keep it there because it has a tile floor so it’s easier to clean spills since Chai loves to play in the water with his little paws lol.

Finally, they get 1-2 packs/cans of wet food daily per sibling set. Every time I put them in their cat/kitten rooms, I give them a can of wet food to share between each sibling set so they usually get this at night. But if I put them in their room mid-day for any reason, I give them an extra can then too so the amount they get depends on my need for them to be in their rooms but it averages 1-2 cans/day, per sibling set. Wet food is essentially a treat since their main diet is their kibbles, so since none of our cats are territorial around food or ever actually hungry, they are always happy to share the wet food cans between them.

CARDBOARD BOXES.

The cardboard boxes and shipping paper items in this room rotate all the time depending on what we have on hand at any time. Whenever we get a delivery I put the boxes out for them to play with and if I notice a particular one they really love to play with, then I put it in their room until they get tired of it. This makes sure that they always have something in their room that’s new and different and fun.

Be very careful that you always remove any tape, staples, twine, string, or small bits from anything you give cats to play with. Also, never give them normal paper (like printer paper). I only give them the soft crinkly paper used to stuff shipping boxes, and only if it’s in a large piece so that they don’t eat it.

CAT TREE.

Their “cat tree” was a DIY we built right after we adopted them out of lumber, plywood, and carpet. They love it and play/climb on it all the time and it’s a great place for them to scratch. If you’d rather buy one, here are some options: Amazon | Amazon | Amazon | Amazon | Amazon | Amazon | Amazon | Amazon.

SCRATCHERS.

I keep 2 cardboard scratch pads (this is the one that I like best because it’s so simple: Amazon) in here and have 2 on every floor in our house. They love them and usually opt to scratch these over other things in our house as long as they have access to them. You can also sprinkly cat nip on them for added fun!

CAT CARRIER.

The cat carrier (similar: Amazon | Petco) to the left of the cat tree has a little fuzzy blanket inside and I just leave it open all the time because it’s Mocha’s favorite sleeping spot.

TREE COLLAR.

The metal tree collar (Home Depot) is something we actually never used for Christmas and I was originally intending to return it but Chai fell in LOVE with it so I gave it to them and he loves to sleep inside it. I think he feels like it’s his little castle.

CLOSET.

The closet in this room is Matcha’s favorite sleeping spot. I keep one door permanently shut to create a little nook and the other door open. Inside I have a decorative bowl she loved to sleep in as a kitten and still loves but she kinda can’t fit into it anymore because she’s a big kitty now so I also have a plastic storage bin with a blanket in the closet nook that she inevitably actually sleeps in after realizing the bowl isn’t comfy enough. She picked the storage bin herself from the basement. She just started sleeping in it so I gave it to her. But I leave both the bowl and bin for her because I know she loves them.

KITTY FORT.

This is not not in any of the pictures because I don’t actually have it in their room, but I thought I’d mention it anyways. One of our cats’ favorite toys is this little step-stool (Amazon) simply covered with an old bedsheet. We have one of these stools on every floor of our house for convenience anyways, so all I have to do is cover one of them with a sheet to make the cats’ day! This literally keeps them entertained for hours so I’ll often set it up for them in a random part of the house for them to have fun with. It’s small enough to not cause much visual clutter (plus if you have a white stool and white sheet, it’s a pretty minimal look) and since there are only 2-parts to it, it’s easy to clean up.

HEALTH & SAFETY

  • Our cats are spay/neutered. This is best for their healthy and prevents territorial behavior.
  • Our cats are indoor only. This is best for their safety and longevity.
  • Our cats are NOT declawed! Declawing is an horrific, inhumane, barbaric, out-dated practice that is thankfully banned/illegal in many places. Please never EVER declaw a cat!

More of our cat-related posts:

  • Cat-related Sources & Cleaning Tips: click here
  • How to Stop Cats from Scratching Furniture: click here
  • Cat Training Tips: click here
  • How to Introduce New Kittens to Older Cats: click here
  • How to Cope with Cat Allergies: click here
  • Cats & Decor Tips: click here

Filed Under: Cats

Cat-Related Sources & Cleaning Tips

October 20, 2019 by admin Leave a Comment

Cat-related sources:

  • Litter box: Amazon
  • Dry food: Walmart | Petco
  • Wet food: we feed a variety (grain-free)
  • Grooming tool: Amazon
  • Scratching pads: Amazon
  • Nail cutter: Amazon
  • Water fountain: Amazon | Walmart
  • Couch leather conditioner: Amazon

To keep our floors clean and fur-free, I use a combination of the cleaning sources listed above and good grooming routines. I run the roombas either every day or every other day (they’re specifically excellent for cleaning cat hair – they get stuff you can’t even see!), I also vacuum the stairs once day with a cordless vacuum, and I groom the cats every other night. Even before getting roombas, we rarely spent more then 10-15 minutes a day cleaning because we cleaned different zones of our house on rotation so that we weren’t left with situations of having to clean the entire house in one day. For our house cleaning routines, click here.

We keep a litter box on each floor of our house, plus one in each cat room. I clean all the boxes every morning and vacuum the 2-ft directly in front of them. Cleaning all the boxes only takes me few minutes in total and this regular cleaning combined with using self-clumping litter keeps our house odor-free.

Grooming the cats regularly makes a biggest difference in keeping the house fur-free. I use this grooming tool and I groom our cats at night before bed once or twice a week. The logic is to groom the loose hair off them before it gets on the floor/furniture. I also wipe them down once a day with a damp hand-towel. (Note: Please don’t bathe your cat unless recommended by a veterinarian. It’s completely unnecessary – cats are naturally very clean animals – and unless you have a rare cat who loves water, bathing cats just causes trauma for everyone involved.) Regular grooming and wiping with a damp towel also both help with allergen control. For more on How to Cope with Cat Allergies, click here.

For food, we have been feeding them this allergen-reducing dry kibble for quite a while now and they love it – you can do some research on it but it’s a pretty cool formula. They also get wet food every night.

For water, our cats share a water fountain in our mudroom on the tile floor, they also have bowls of fresh water (and kibbles) always available in their cat room which I refill every morning.

For scratchers, we keep these scratch pads on every floor and sometimes I’ll sprinkle a little catnip in them. This is part of what helps prevent our the cats from scratching our furniture. For more info on How to Stop Cats from Scratching Furniture: click here.

For leather care, I use this amazing leather conditioner to buff out any scratches that appear on our leather sofa. It legit removes scratches if you apply it as per the package instructions. I just use a clean cloth and rub a little of it into the leather. It works miracles! I seriously swear by this stuff.

Cleaning sources:

  • Robot vacuums: We have 2 different styles of these for different parts of our house. First is this: Walmart | Home Depot (regular vacuum, manual disposal). Second is this: Walmart | Home Depot (automatic disposal). We specifically have these because we have five rescue cats but my husband is allergic to cats to we have these to control the allergens in our home and they both have high-efficiency filter systems and they cover a lot of ground. We run them both 4-6 times a week in different parts of our house but I should note that the purpose of these in our house is to remove cat hair from our floors – like the subtle stuff that you don’t even see – and they do a fantastic job at this in particular. But in terms of actually cleaning floors after a mess or a spill, or like cleaning under the dining table after a meal, cleaning up crumbs, or cleaning an entryway mats etc, that stuff we still need to do ourselves because the roombas honestly just aren’t as good at it. So in our house we use them specifically cat allergen controllers, otherwise we probably wouldn’t have them.
  • Cordless vacuum: Amazon | Walmart. We have 3 of these for different parts of our house. It’s very smooth to use and has multiple attachments and overall it’s my favorite and most used vacuum. We keep our entire house clean with this vacuum. If you are looking for a single, awesome vacuum recommendation, this one is it! If I could choose to only have one vacuum, I would choose this one.
  • Corded vacuum: Amazon | Walmart. We’ve had ours for many years (ours is the slightly older version of these) but since getting our cordless vacuum cleaners and robot vacuums, I’ve used this corded one less and less. It’s a very good vacuum though and I’ll use this once a month or so for a deeper clean, but that’s it. If you have pets, this is a great vacuum for deep cleans.
  • Floor mop: Amazon | Walmart

Health & Safety:

  • Our cats are spay/neutered. This is best for their health and prevents territorial behavior.
  • Our cats are indoor only. This is best for their safety and longevity.
  • Our cats are NOT declawed! Declawing is an inhumane, barbaric, out-dated practice that is banned/illegal in many places. Please never ever EVER declaw a cat!

More cat-related posts that might help:

  • Cat Room Tour: click here
  • How to Stop Cats from Scratching Furniture: click here
  • Cat Training Tips: click here
  • How to Introduce New Kittens to Older Cats: click here
  • How to Cope with Cat Allergies: click here
  • Cats & Decor Tips: click here

Filed Under: Cats, Cleaning

Christmas Decor 2019

October 14, 2019 by admin 2 Comments

Here’s a list of the Christmas decor we used around our house this holiday season! I’ve listed the exact item where possible, similar options in situations where I couldn’t find the original or just to give variety and options (always labeled as ‘similar’), and linked to all relevant DIY Tutorials for items we made. Please note that since these are mostly seasonal items, availability is always subject to change at any time.

MANTEL:

  • Black modern Christmas trees: DIY Tutorial (Very similar: Crate & Barrel | Target)
  • Striped vase: Crate & Barrel
  • White vase: Crate & Barrel
  • Greenery mix: Michaels | West Elm | Michaels
  • Gold reindeer (similar): West Elm
  • Round mirror: Amazon | Wayfair | Urban Outfitters (same mirror)
  • Fireplace: Amazon | Walmart
  • Mantle: real barn beam
  • For more, visit our Living Room sources page

CHRISTMAS TREE:

  • Tree box stand: DIY Tutorial | Alternative tree collars (these all look gorgeous but will be too short to deter cats): Crate & Barrel (wicker natural) | Crate & Barrel (woven black/gold) | Crate & Barrel (textured gold) | Crate & Barrel (galvanized metal) | Target (metal) | Home Depot (metal) | BarnwoodUSA (Etsy) (wood crate) | Pottery Barn (basket) | Wayfair (gray crate with X) | Wayfair (dark crate no X) | Target (basket w/handles) | Target (black poplar) | Target (white rope)
  • Salt dough ornaments (stars): DIY Tutorial | Similar wood ones: H&M Home
  • Starburst ornaments (similar): West Elm | Target | Crate & Barrel
  • Wire ornaments (similar): West Elm | Crate & Barrel | Target | H&M Home
  • Tree topper (I didn’t use a tree topper this year but I would have used one of these if I was planning to do one): Crate & Barrel | Crate & Barrel | McGee & Co
  • Other ornaments I love: McGee & Co (gold) | McGee & Co (black) | H&M Home (paper) | Target (snowflake) | Target (snowflakes)
  • Garlands I love: McGee & Co (bells) | Kirklands (bells) |

KITCHEN:

  • White cotton wreath: Amazon | Similar: Wayfair | Pottery Barn
  • Other holiday wreaths I love the look of: Crate & Barrel (faux cypress) | McGee & Co (faux cedar) | West Elm (gold leaf) | West Elm (silver leaf) | West Elm (geometric) | Target (white) | H&M Home (metal) | Target (modern) | Target (rustic) | Anthropology (greenery)
  • Wooden trees: Michaels | Similar: Crate & Barrel
  • White snowflake lantern: Michaels
  • Nutcracker (similar): Target | Michaels
  • Glitter reindeer (similar): Walmart
  • Bottle brush trees (similar): Crate & Barrel | Crate & Barrel
  • For more, visit our Kitchen sources page

DINING ROOM:

  • White ceramic houses (similar): Crate & Barrel | Bed, Bath & Beyond | West Elm | Target
  • White ceramic trees (similar): West Elm
  • For more, visit our Dining Room sources page

FOYER:

  • Pre-lit tabletop Christmas tree: Wayfair
  • Nutcracker: Michaels
  • For more, visit our Foyer sources page

MUDROOM:

  • Most Wonderful Time pillow (similar): Wayfair
  • Buffalo check pillows: Amazon (Similar: Pottery Barn)
  • White faux fur pillow (similar): Pottery Barn
  • Wood Christmas village/trees: DIY Tutorial
  • Wood tree by vase: Michaels | Similar: Crate & Barrel
  • Gold greenery: Michaels
  • For more, visit our Mudroom sources page

BATHROOMS:

  • Pre-lit Christmas tree: Wayfair
  • Flocked tabletop Christmas tree: Wayfair
  • For more, visit our Powder Bathroom sources page
  • For more, visit our Buffalo Check Bathroom sources page
  • For more, visit our Master Bathroom sources page

WRAPPING PRESENTS:

  • Natural Wrapping Paper: Amazon | Walmart | Walmart
  • Black Paper Gift Tags: Amazon | Walmart
  • Burlap 3″ x 10 Yards: Amazon | Walmart
  • Natural Twine Gift Wrap String: Amazon | Walmart
  • Striped twine: Amazon | Walmart (black & white)
  • Striped twine: Amazon | Walmart (red & white)
  • Striped twine: Amazon | Walmart (green & white)
  • Striped twine: Amazon | Walmart (natural & black)
  • Striped twine: Amazon | Walmart (multicolored sets)
  • Label maker: The Container Store | Walmart | Amazon
  • Label refills: Amazon (black) | Amazon (multicolor)

SNACK BOARD SOURCES:

  • Slate cheese board: Crate & Barrel
  • Copper handled cheese knives: Crate & Barrel
  • Christmas tree ramekins: Crate & Barrel
  • More favorite cheese boards & cheese knives on our Cheese & Crackers Snack Boards blog post

Filed Under: Christmas, Past Decor

How to DIY a Nightstand Charging Drawer

October 8, 2019 by admin 7 Comments

Ever since I mentioned that in our master bedroom and guest bedroom we turned the bottom drawer of our nightstands into “charging stations”, I’ve been asked what they look like so if you’ve been curious about that, then here’s a pic inside one of the drawers!

What we did could be done on any 2-drawer nightstand, or at least a nightstand with a drawer that’s positioned somewhat lower down. Basically we just drilled a hole at the back for the power strip’s cord to go through and then attached the power strip to the side of the bottom drawer so that you can easily plug in your electronics there without any messy wires visible!

You have to pull enough of the power strips cord into the drawer for the drawer to be able to open and close without it catching at the back (this length will depend on your drawer) and, again this will depend on the configuration of your specific nightstand, but in ours I just let the extra length pool in the space behind the drawer – so it’s inside the nightstand box, but not in the drawer.. You also have to attach the power stop low enough on the side of the drawer so that the drawer can close.

As for the wires going into the wall, I just bunch them up and tie them together behind the body of the nightstand. If you do this carefully, they basically disappear.

Nightstand sources:

  • Our nightstands: Wayfair (they go in and out of stock)
  • Other nightstands I love the look of: World Market | West Elm | West Elm | West Elm | Overstock | Overstock | Overstock | Wayfair | Wayfair | Target | Target | Target

Other master bedroom sources:

  • Lighting: Rejuventation
  • Accent pillow: CB2
  • White quilt & pillow covers: Overstock
  • Sheet set: Parachute
  • Pillows & duvet inserts: Parachute
  • Euro pillow covers: Amazon
  • Wheat wreath: I made ours (click here for tutorial)
  • Whole house paint colors listed on our home page below FAQs.

Filed Under: Tutorials

How to DIY a Faux Brick Wall with a German Schmear

October 2, 2019 by admin 41 Comments

Ever since we started designing our house, I’ve loved the idea of doing a brick wall somewhere. It’s rustic, cozy, and industrial and depending on how you style it, it can also be very modern. But real brick walls are not only expensive but also very time consuming to install, not to mention quite permanent, so I started exploring the idea of a “faux brick wall” instead BUT I wanted it to look real. There are many options for how to do this and I’m pretty sure I’ve researched every one of them at this point. The reason I settled on using this method that I’m going to share with you here was that it was the perfect combination of everything I was looking for: It looked real, it felt real, it was easy to DIY, it was cost effective, and most importantly it gave me exactly the look I was going for. So, here’s how we did this accent wall…

Also, you can visit our Game Room page to see how this room turned out!

SUPPLY LIST FOR BRICK PANELS & INSTALLATION:

  • Brick wall panels: Home Depot (I used 3, and this particular panel is by far the BEST I’ve found)
  • Jig saw: Home Depot (needed to precisely cut the brick panel edges)
  • Construction adhesive: Home Depot (2 tubes of this per panel, so I needed 6 tubes)
  • Carpenter’s square: Home Depot
  • Brad nailer: Home Depot
  • Level: Home Depot
  • Ladder: Home Depot
  • Pencil

SUPPLY LIST FOR GERMAN SCHMEAR & APPLICATION:

  • Pre-mixed joint compound: Home Depot (for 3 panels, I used half this container, but the smaller container isn’t enough so it’s better to buy this size and save the rest for future projects)
  • Plastic putty knives: Home Depot (I used both the smallest and biggest of this set, very important to use plastic, not metal knives as metal will damage the panels)
  • Drywall hawk: Home Depot (this isn’t 100% necessary but it makes work SO much easier)
  • Ladder: Home Depot
  • ~1 cup water

HOW TO MAKE THE WALL:

  1. PREPARE BRICK PANELS.
  2. INSTALL BRICK PANELS.
  3. GERMAN SCHMEAR.

STEP 1: PREPARE BRICK PANELS.

I did a lot of research before choosing these brick panels to use for this project. I chose them because they’re realistically formed with a 3-dimensional textured and raised imprint, and the pattern doesn’t repeat so even if you put three of these panels beside each other, like I did, it looks real.

The downside is that because they come in 4×8 evenly rectangular boards, that means that if you simply put three of them in a row as-is, you’re going to see a seam between them no matter how talented you are with joint compound because every other half-brick along the seam will visually be cut in half.

So the secret to making these panels turn into what looks like a real brick wall was to cut out every other half-brick along the edges (as shown in the pics) so that the panels could literally interlock and this was definitely something that could be hidden with joint compound even if you have no experience!!

To do this, we first outlined the cut lines with a pencil and carpenter’s square. You want to be sure you’re cutting in the middle of the grout line.

We used a jig-saw (like this one) to make the cuts. This is a labor of love which my dad very kindly did for us (thanks Dad!!!!) but it is absolutely essential to making your faux brick wall look real.

Once you’ve cut all your panels, lay them out on the floor beside each other and make sure that they actually interlock properly. If there are little spots that don’t fit, it’s easy to make additional cuts now to fix that, but if you skip this step you’ll be in big trouble when you install them. If you have a little extra space between the panels in some places (even up to 1/2″), don’t worry – that can all be hidden later.

Note: because of the nature of the cuts, you will need to take one brick row off the bottom of one of the panels so that the panels can actually interlock. I recommend removing the row from the bottom as it will be less obvious. And again, make sure you are cutting in the middle of the grout line.

Note: depending on how many panels you need to make your wall, the sides you cut will be different. I needed 3 panels so the Left Panel needed the right side edges cut, the Middle Panel needed both left & right edges cut, and the Right panel needed the left side edges cut. You need to basically cut anywhere that one panel joins another panel, but don’t cut the edge that goes against a wall because you need that one to be straight. (The pics below show what I mean by this.)

STEP 2: INSTALL BRICK PANELS.

We installed our now pre-cut brick panels using a combination of both construction adhesive (you’ll need 2 tubes per panel so make sure you have all the tubes you need on hand) and a brad nailer for added reinforcement. In my opinion, you need both of these (the adhesive and the nailer) to properly install these panels. If you just use adhesive you risk sagging, if you just use the nailer you risk unevenness.

Start with either the far left or far right panel (whichever has a corner edge). Lay the brick panels face-down on the floor and apply the adhesive. When you’re applying the adhesive, make sure it’s even and that you run a line down every one of the protruding brick cuts so each one gets glued to the wall.

It takes 2 people to install the panels. Lift your panel into place and square it up with your ceiling and corner, then use a level to make sure it is level both horizontally and vertically. Don’t worry if there’s a bit of a gap on the sides or top (up to a 1/2″) – you can fix this with the compound in the next step.

Once your brick panel is in place, use a brad nailer with 18-guage nails to secure the panel to the wall (preferably into the studs) and make sure you put a nail into each of the individual brick cut edges. It’s a good idea to make a note of where your studs are before you start, but mark them on the floor with tape or something because your wall is about to get covered by the panel.

Then repeat until all the panels are installed. Make sure you check that each one is level. You may need to use a rubber mallet or a solid thump with the palm of your hand to make the brick cut edges interlock.

STEP 3: GERMAN SCHMEAR.

You will need 5 things to do this step:

First you’ll need pre-mixed joint compound. I use this particular kind because it’s less dusty, and has a drying time of 24 hours. This is SO important because you want to be able to do your whole wall, then go back and make adjustments here and there before it dries, so whatever you do, do not get a fast drying compound. I used half that container for my 3 panels, but it’s a good product to have on hand so I don’t mind having extra, and the smaller size it comes in isn’t enough to complete this project so this was my best option. And I way prefer this pre-mixed compound to the mix-it-yourself kind because omg it’s such a time-saver! Also, grab yourself a glass of clean water to have on hand. I’ll explain why down below.

For your application tool, you’ll need plastic putty knives. I got this inexpensive set and used both the biggest and smallest ones. You need plastic because metal ones will damage the brick panels.

To make your life easier, I recommend using a drywall hawk to hold your joint compound and the style that I linked is what I consider to be the most ergonomic one and it shouldn’t make your arm ache during the couple hours it’ll take you to do this project. This is a nice-to-have (but not a need-to-have) item.

Finally, you might need a ladder (I love this light-weight one) since these are 8-foot high panels. Our basement ceilings are 10-ft high and even though we installed these panels below a bulkhead, it was still super helpful to have a ladder to work on.

Ok, so now that you have all your tools and materials, here’s what to do with them.

First, I suggest thinning out your drywall compound just a little bit. You don’t have to do this, you can certainly just use the compound straight out of the tub, but I find that a little water makes it easier to work with. So use the small putty knife to scoop out about 2 cups of the joint compound onto the middle of your drywall hawk. Then make a little indent/hole in the middle of the compound glob and pour about 1-2 tablespoons of water into the center, then slowly mix it into the compound. The final consistency you’re looking for is kinda like creamy mashed potatoes. It should be smooth enough to easily stir BUT firm enough that it won’t slide off the hawk if you tip it at a right angle to the floor.

Put the lid firmly back on your compound tub (it will dry out if you don’t) and clean off the small putty knife. Clean everything as you go!

To get started on the next part, grab your biggest putty knife out of the set I showed, along with your hawk with the mixed compound, and your ladder and now it’s time for the exciting part!!

To do the “schmear” you just grab a big a glob of the compound on your putty knife (I’m guessing about 1/4 cup) and scrape it onto the wall. Then literally just scrape it around going left, right, up, down, sideways, whatever way you want until you’re happy with the look. I recommend doing about 1 square foot at a time. There is really no wrong way to do this, it’s just about whatever look you want. I recommend getting the compound into the grout lines in most places, but let a bit of the original grout show through here and there for added depth. Basically you’re smearing it on, then scraping it off in every possible direction until you have as much or as little of it on as you want on the wall and you’re happy.

Be sure you get extra compound into the top and side seams between the panels and the wall/ceiling so that there are no holes or gaps there. This is very important to making your wall look finished.

When it comes time to do the seams between the panels, just use extra compound and push it into the cracks between the panels and smear/scrape the compound around until you hide the seam. You might notice that the line/crack between the panels falls in a little as it dries (middle pic below) – don’t worry about that. Make it as good as you can on the first day, then go back the next day and fix up the seam line (third pic below) even maybe with just applying the compound with a finger. It’s pretty forgiving.

You’ll want to work in even sections along the wall and try to stand back every time you move the ladder and make sure that you’re being consistent with your application. I also found it helpful to look at the wall through my camera phone. Don’t ask me why but looking at your work through something else often helps you notice trouble spots. Remember, the less ‘perfect’ it looks, the better!

I personally didn’t worry about making the wall smooth. I wanted a bit of dimension and texture to my wall so while I didn’t leave any big globs, I certainly let some areas be thicker than others.

Note: as the compound dries a little (which it will as you work, even if you use the 24 hour drying one I recommend), you’ll notice that the color will become a little lighter. This means that your work might look inconsistent when you step back to look at it all together, but it’s actually not. So make sure you take this into account when you’re comparing the areas you’re currently working on to the areas you previously worked on for consistency: it will look a little whiter as it dries. But when I say “dry” I mean that in a light sense. It took me 2.5 hours to “schmear” this whole wall and at the end, I was still able to go back and fix up the area I started with so don’t worry about it fully hardening until you leave it overnight.

These pictures above show you what I mean. Left Pic was taken right as I finished and you can see how the coloring looks inconsistent since the different areas of the wall were at different drying stages. Right Pic was taken the next morning and you can see the color fully evened out as the whole wall dried.

OPTIONAL FINAL STEPS.

So, what you’ve seen here is as far as I’ve gotten in this project and I think it’s where I’m going to pause until we get the rest of the basement to the finishing stage since I’m not entirely sure how I want the final wall to look and the less I do right now, the more options I’ll have down the line.

One option is to just leave it like this. My faux brick wall will have lower cabinetry below it so since it’s not a wall anyone will be leaning on, it doesn’t really “require” a top coat.

Option 2 is to “set” the wall with some kind of top coat but make sure it’s one that won’t yellow over time.

Option 3 is to “set” the wall with a mixture of 25% paint to 75% water if you want an even more white-washed look than you already have. I am considering doing this with 25% of our final wall color so that this brick wall will be the exact same white color as what the surrounding walls will be.

Option 4 is to go all the way and fully paint it whatever color your want (in my case it would be white). White brick is a gorgeous look! You could keep the schmear messy or sand it down first.

If you want a smoother wall, you can take a sanding sponge and knock off any high spots (I don’t want a smooth wall so I won’t be doing this, but it’s a possibility, even if you change your mind after it dries).

If you feel you’ve used too much compound and you want more of the original brick color to show through, you can also use a sanding sponge to remove a little of the compound (I might end up doing a little of this, haven’t decided yet). And actually since this compound is water soluble, while you’re applying it, you can also use a damp sponge to remove some of the compound if needed.

So there you have it! This is how we made our faux brick wall! I hope this tutorial was helpful 🙂

Below is a final picture of how this wall turned out. See more of this room on our Game Room page!

If you have any questions, leave a comment and I’ll get back to you.


For more of our tutorials, click here.
To explore the other rooms in our house, click here.
For our daily progress, follow us on Instagram @ahousewebuilt.

Filed Under: Tutorials

How to Stop Cats from Scratching Furniture

October 1, 2019 by admin 4 Comments

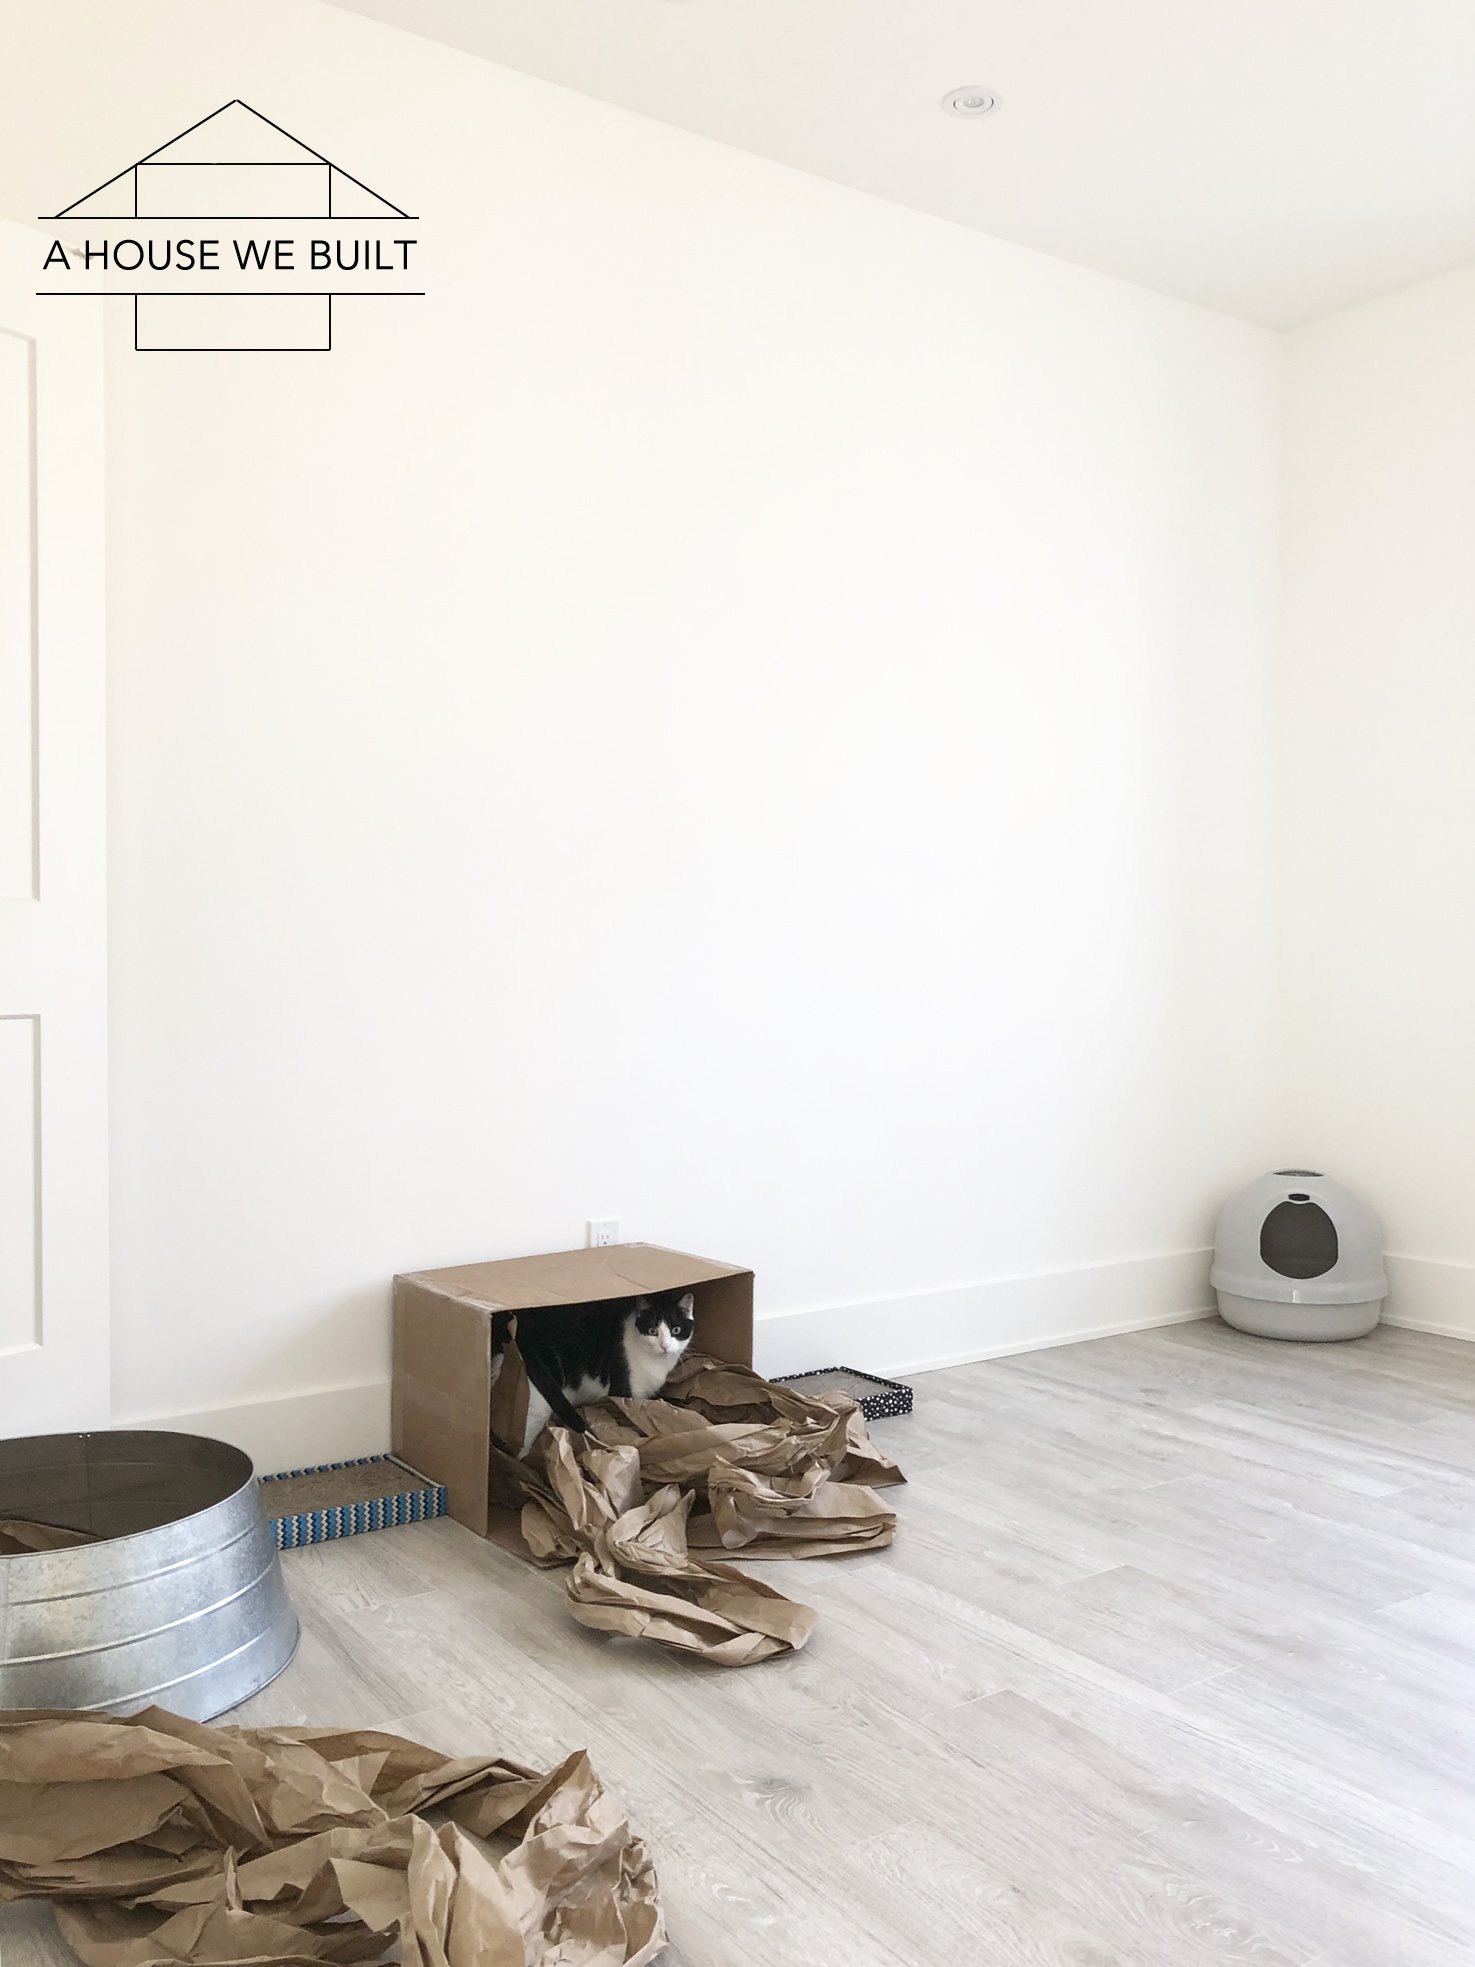
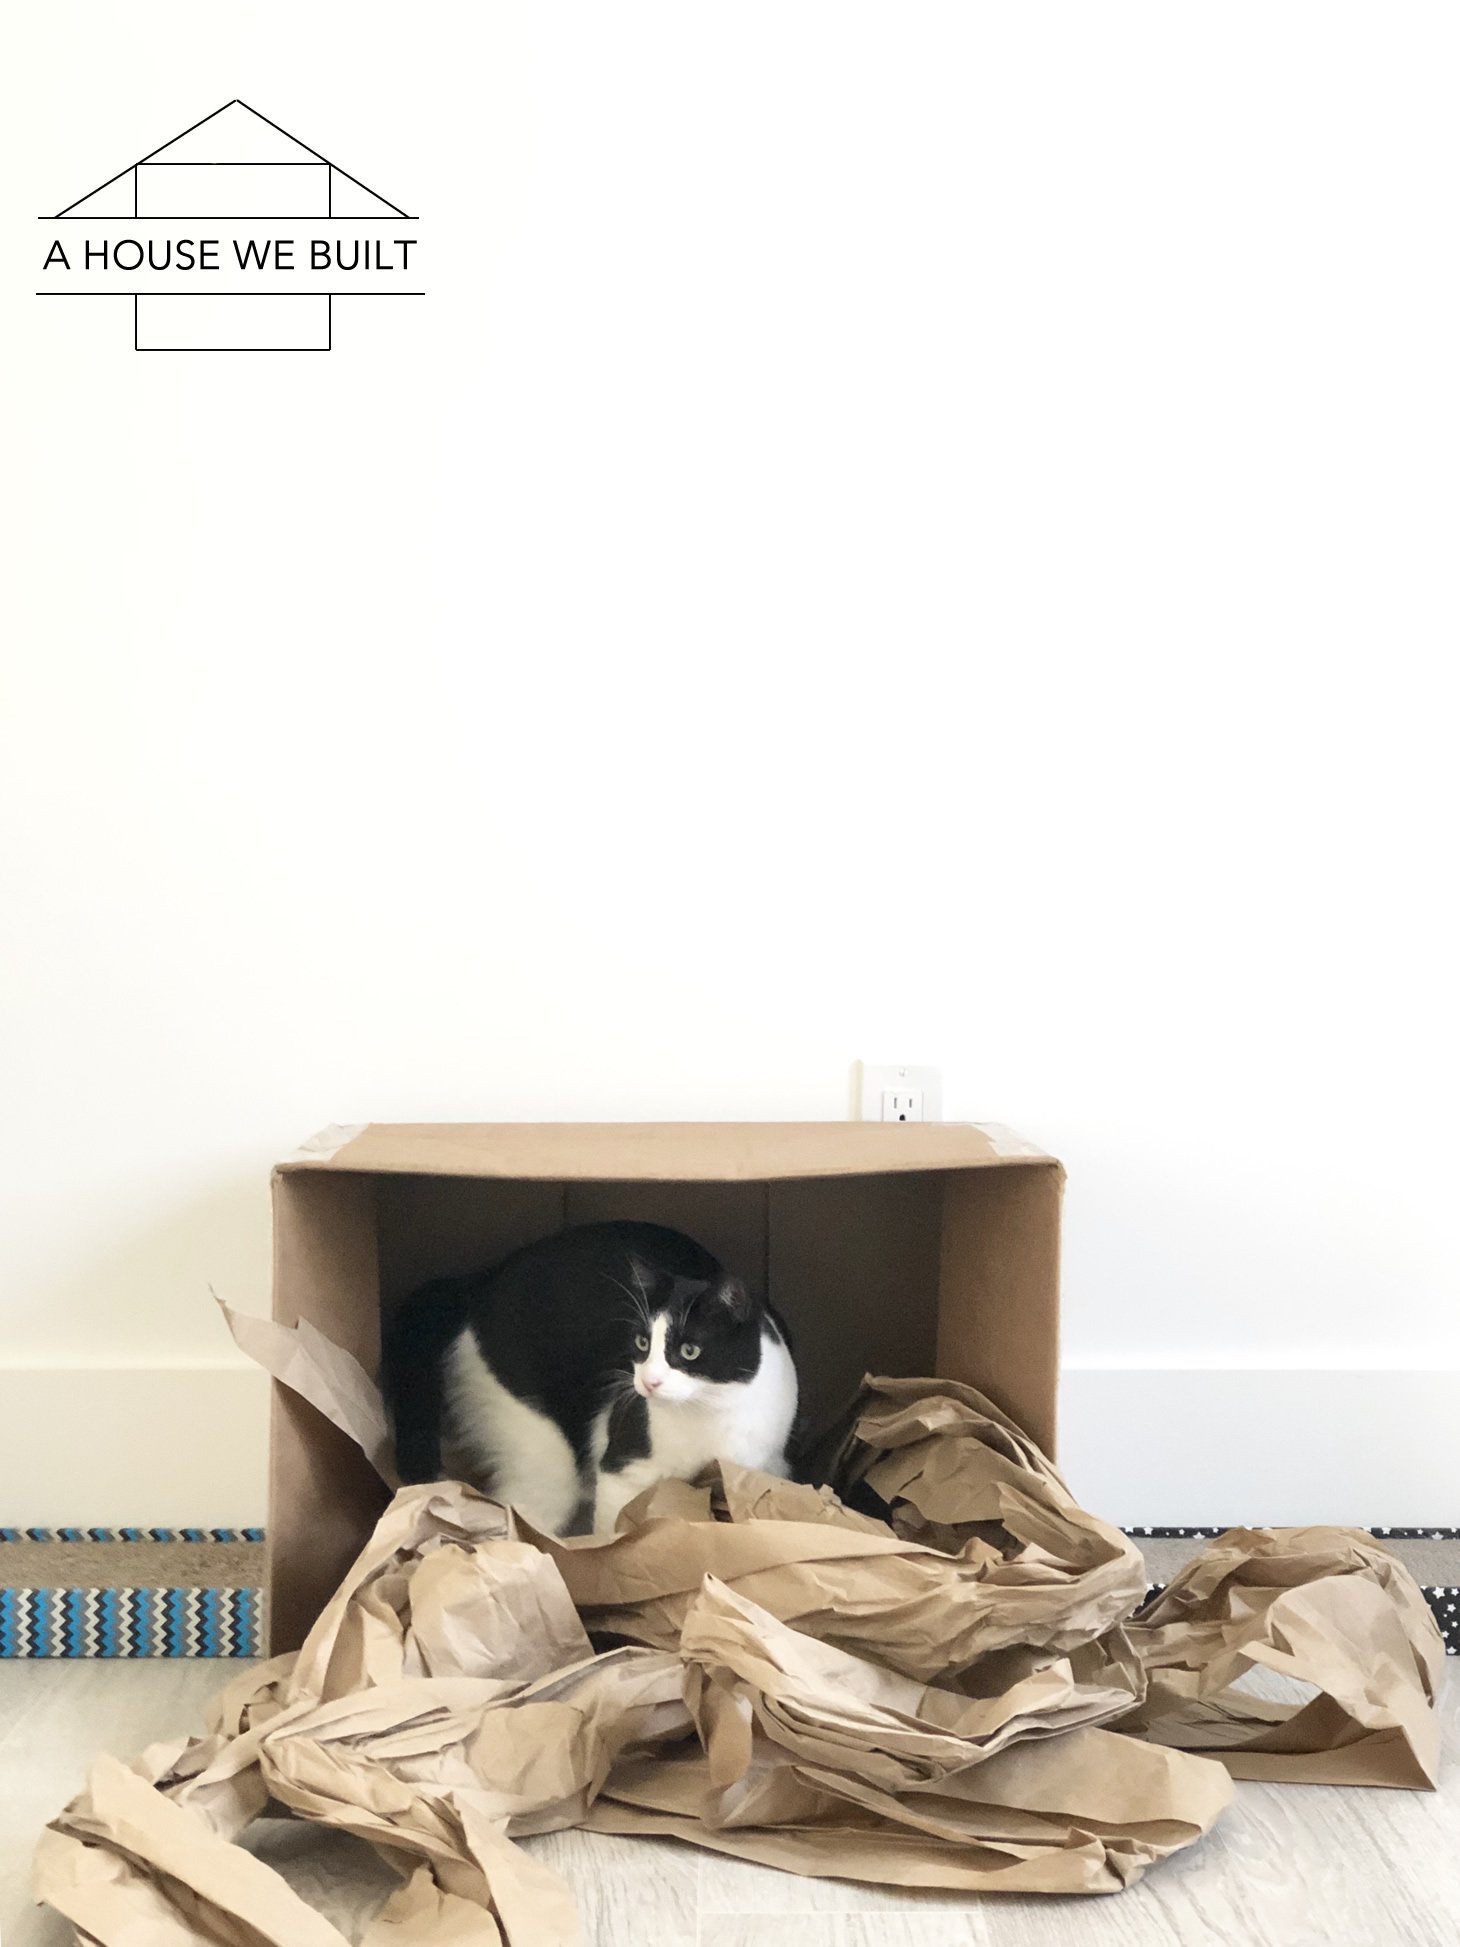
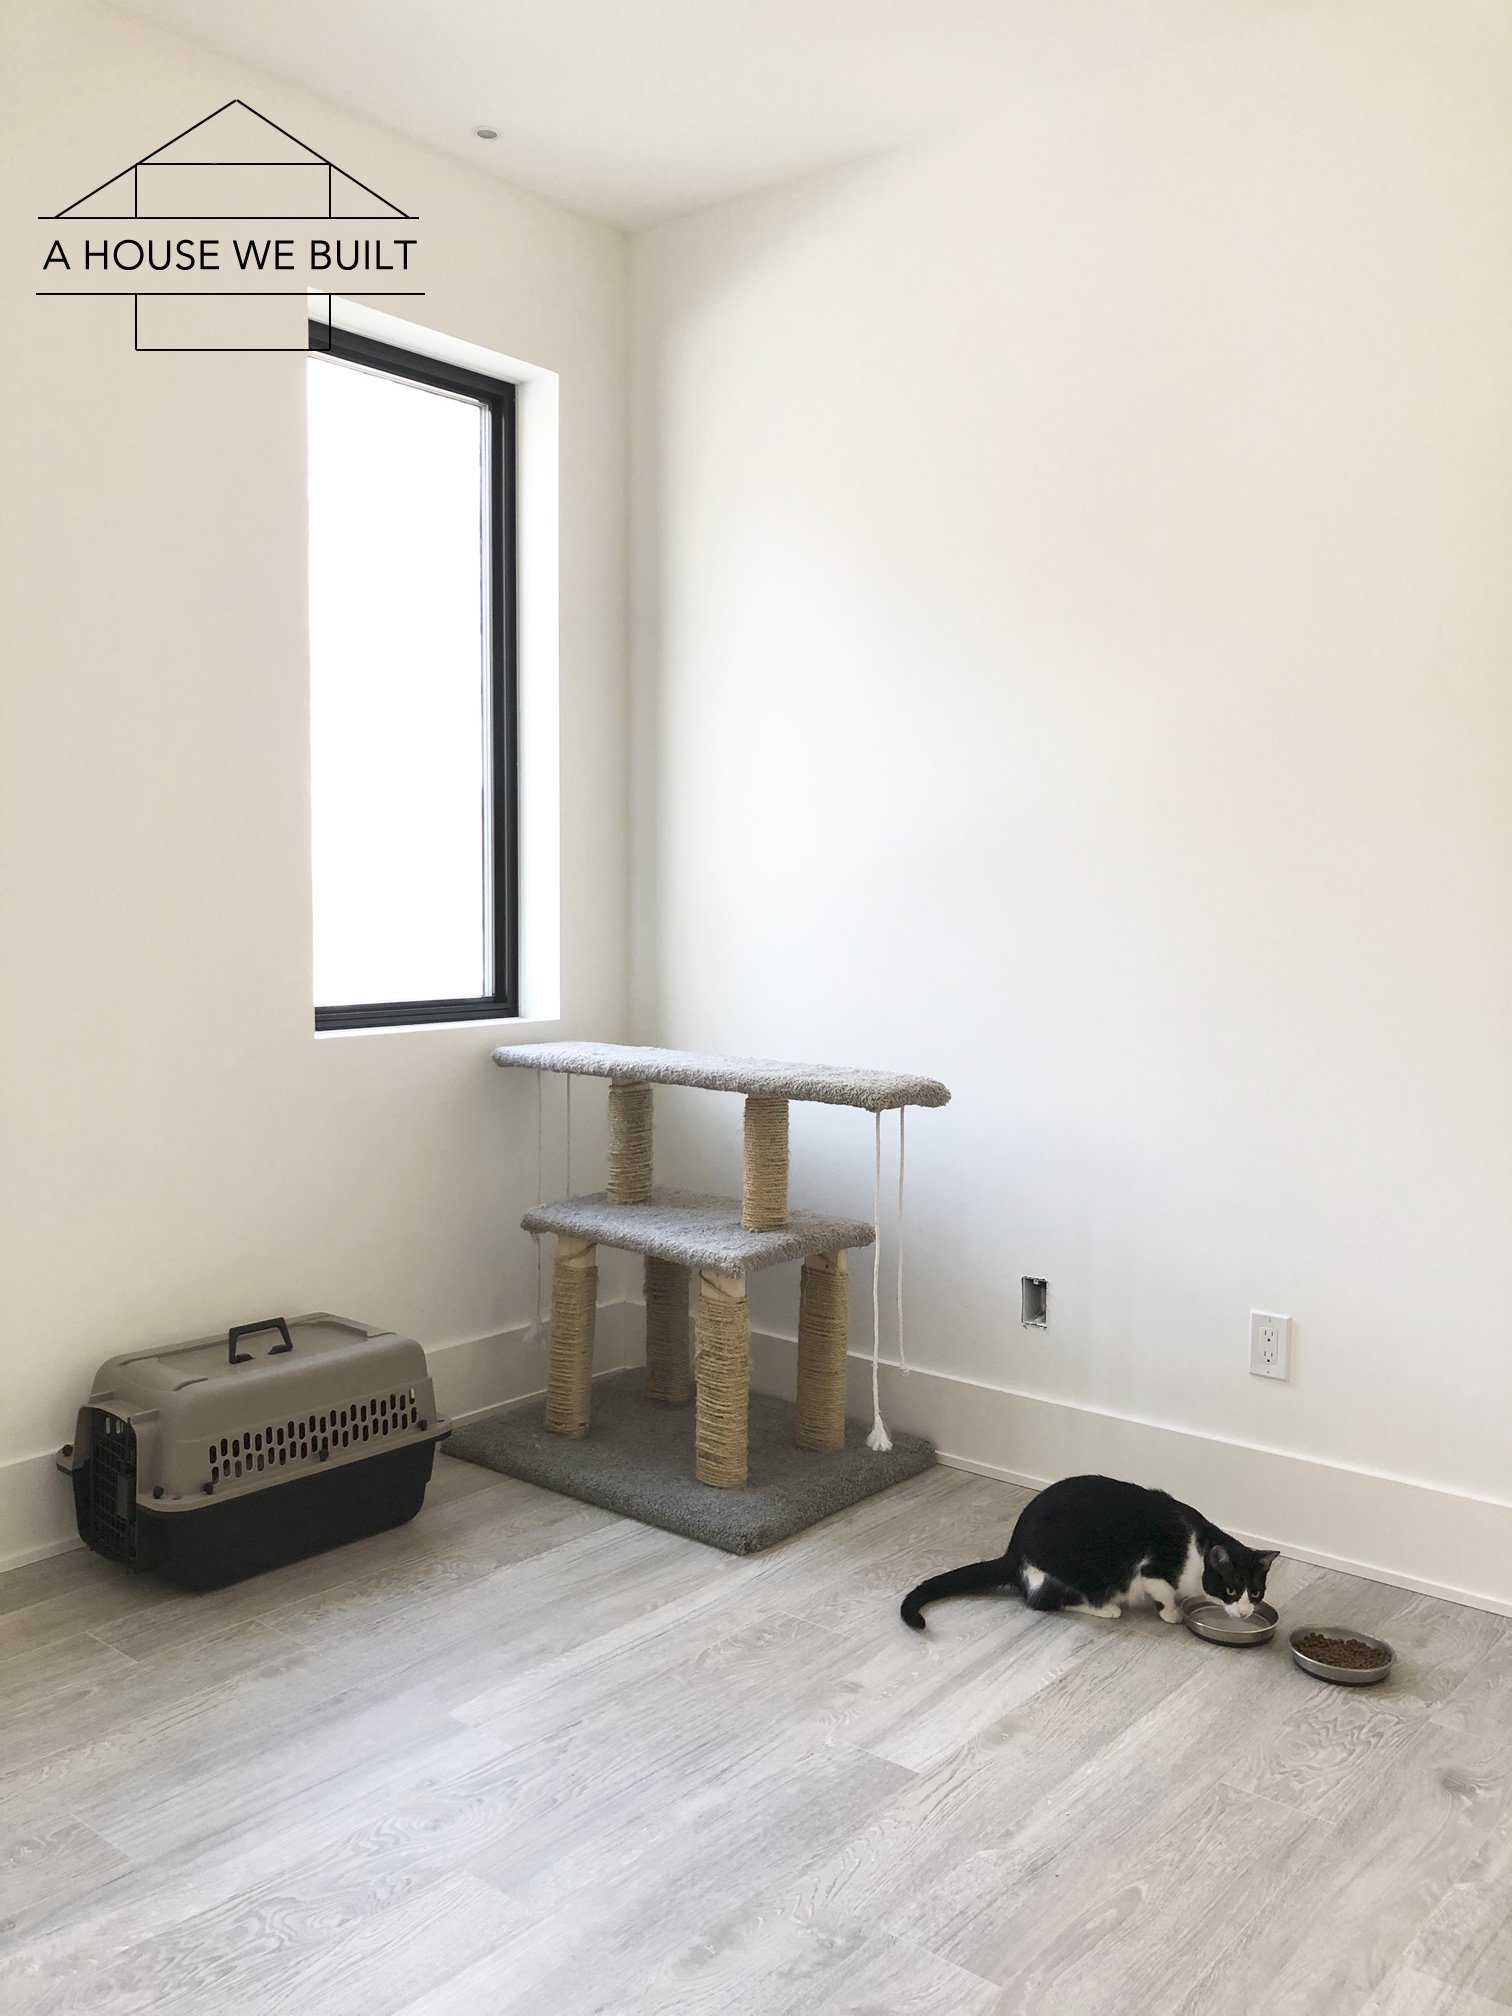
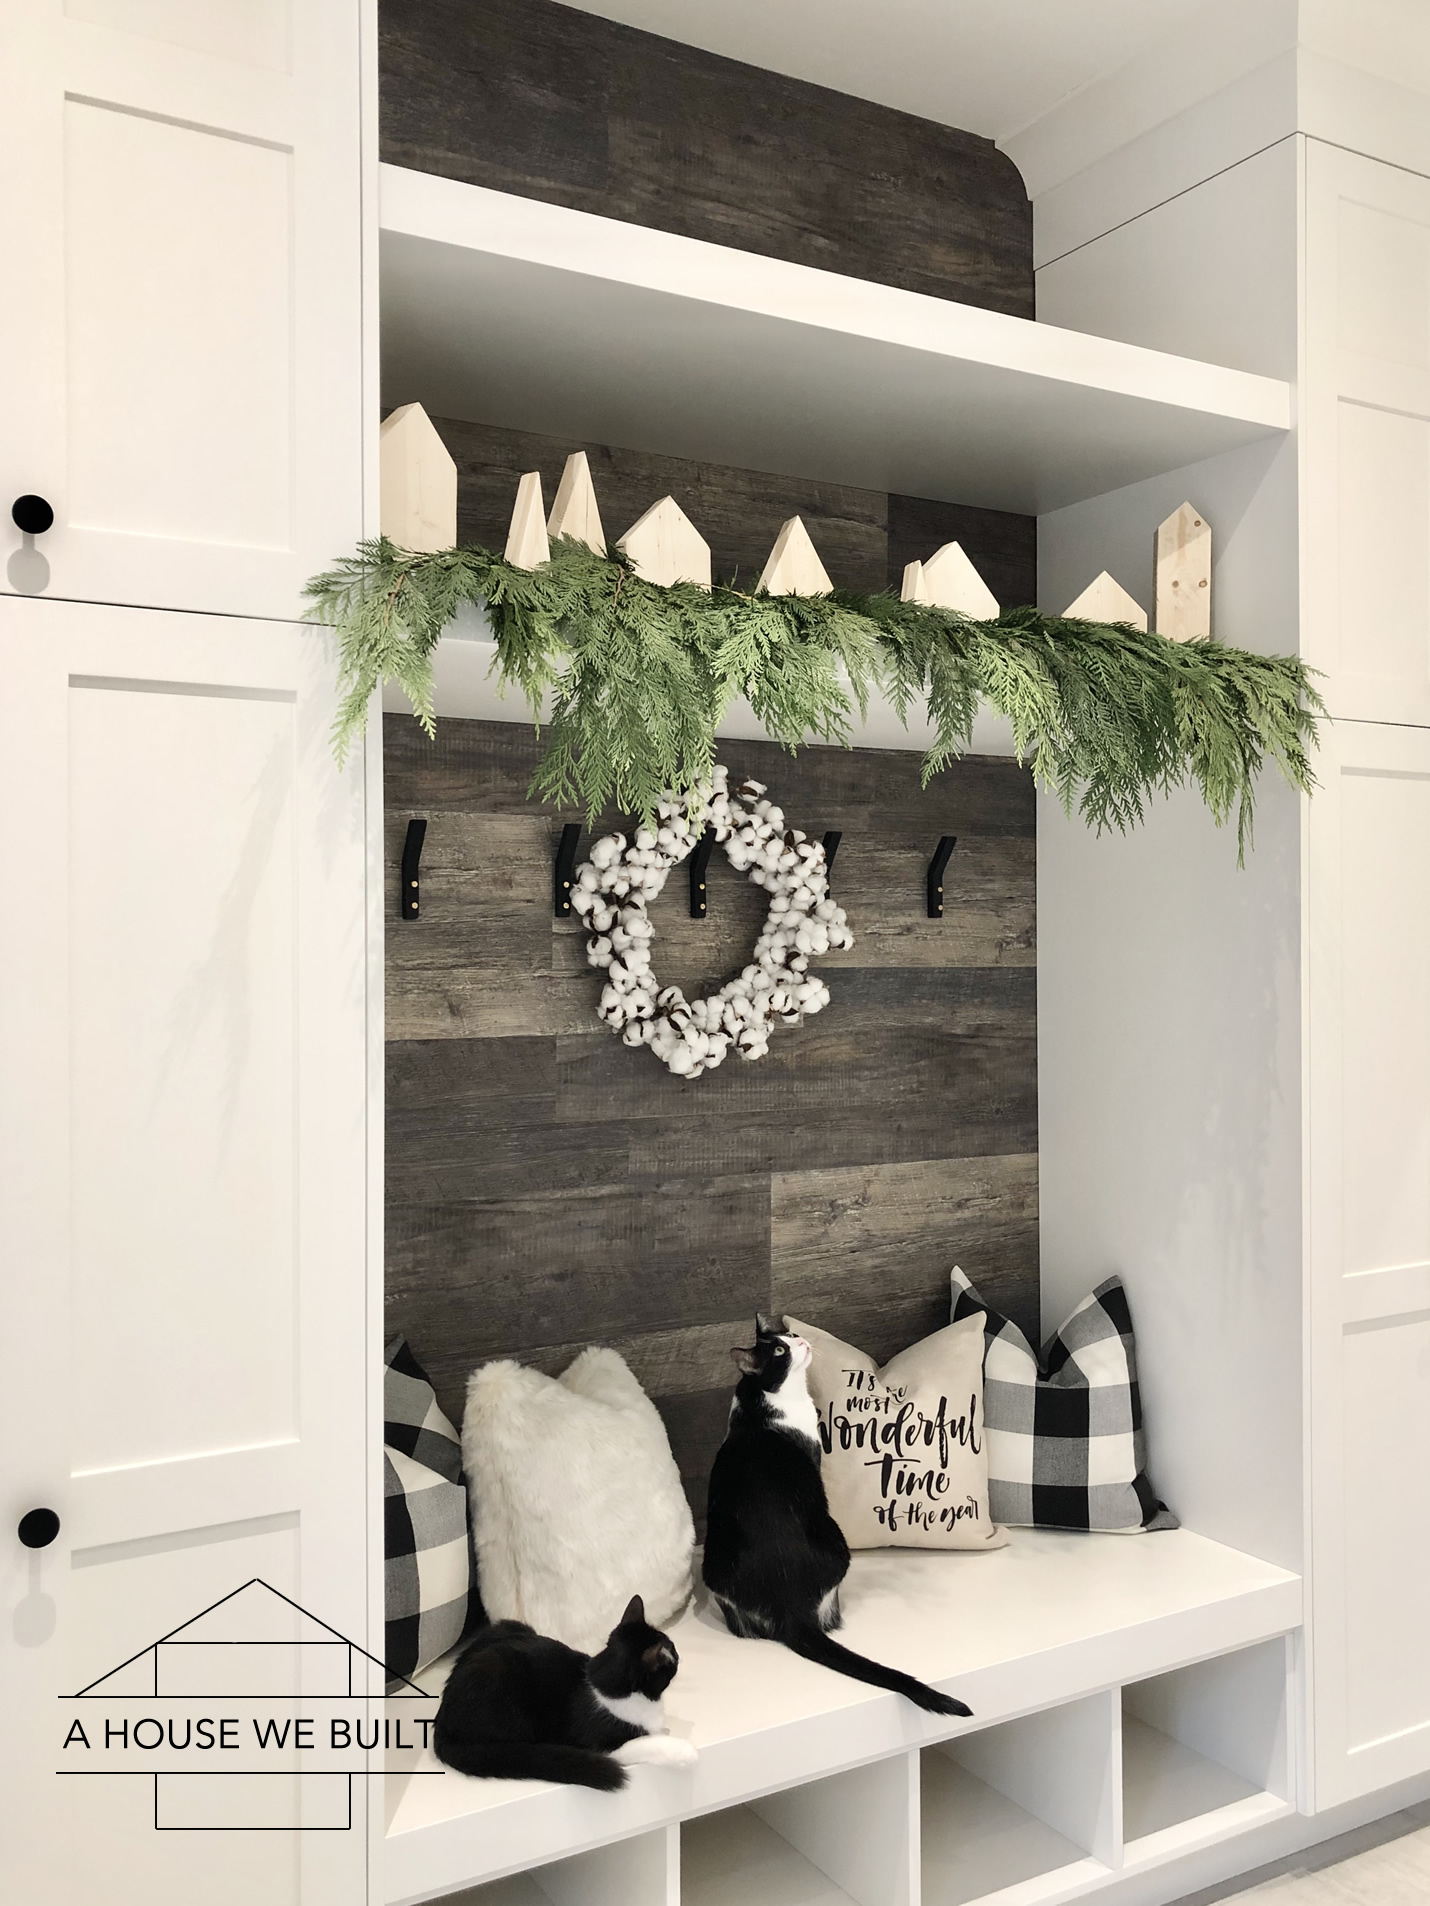
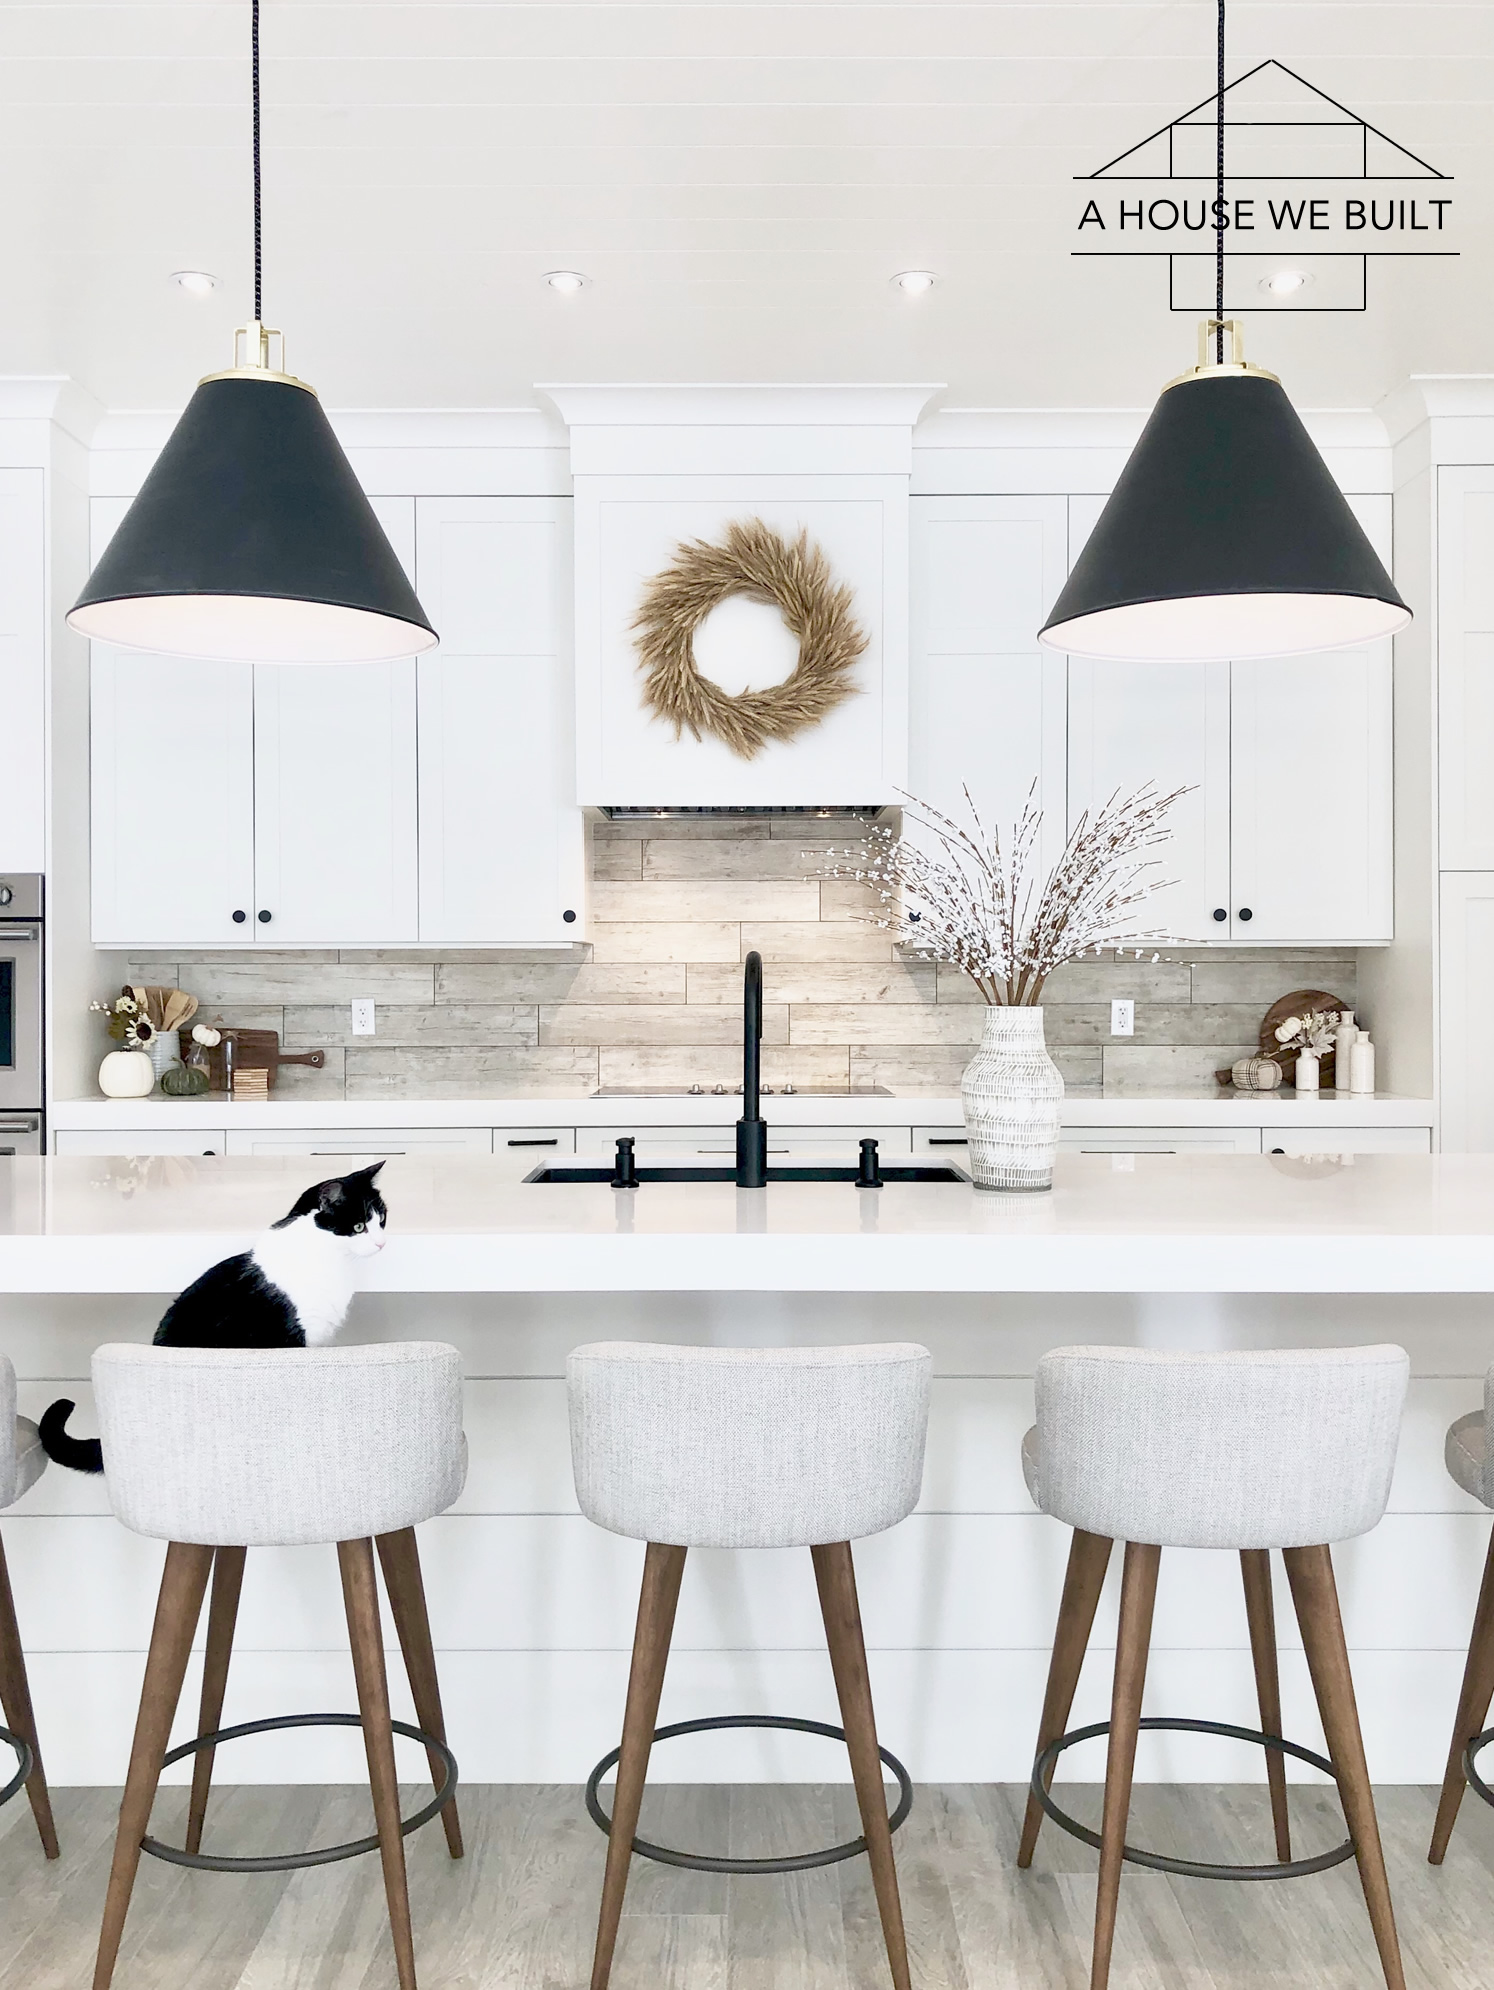
Since we have so many cats, one of the most common questions I get asked on our Instagram page when people see our couches and barstools is “How do you stop cats from scratching your furniture?!” and these are steps we’ve taken to help prevent damage not only to leather but all our furniture. These methods work successfully as you can see by the fact that all our furniture is clearly not damaged.

Our cats are not declawed. Declawing is a cruel, barbaric, outdated practice that is now thankfully banned or illegal in many places. There are many humane ways to stop cats from damaging furniture and declawing should NEVER ever ever be considered as an option. #pawsneedclaws | Also please note that all our cats are all spay and neutered for their health and safety. #adoptdontshop

The first thing to understand is that the concept of not wanting furniture to be scratched is a human one. It is instinctive for cats to scratch so, since it’s our arbitrary choice to not want our cats to scratch our furniture, the responsibility falls to us to create an environment where the cats can still get what they need scratch-wise without scratching our furniture. It is very possible, and here’s how we make it happen:

  1. KEEP NAILS TRIMMED: I keep the cats’ nails trimmed weekly. Pro tip: if you do it while they’re sleeping they don’t even notice. I use a nail clutter similar to this one (Amazon) and a tip I have is that when they’re awake and snuggling with you, make a point to very gently handle their paws — just calmly while you’re giving them scritches and pats, run your hand down their paws too. Be gentle and soothing and totally chill about it so don’t draw attention to what you’re doing but rather just let it feel like a natural part of their petting. This way they’ll get used to you touching their paws and when you go to cut their nails while they’re sleeping it doesn’t bother them because they’re used to you handling them and feel comfortable and trusting about the whole experience. This is the BEST preventative measure you can take because if their nails are not super sharp, they won’t cause as much damage even unintentionally when they just jump up or down from your furniture.
  2. CONDITION & CARE: For our leather couches, anytime the cats accidentally or unintentionally scratch the leather, I use this leather conditioner (Amazon) and put a little on a clean towel and rub it into the spot vigorously for about 5 seconds and it practically removes the mark (especially after a few coats). If the scratch is pretty deep it might turn the scratch a darker color briefly, but don’t worry, once it dries in my experience it goes back to normal and the scratch fades. Depending on how bad the scratch is you might have to do this a couple times but at least in our situation and for our couches, this has worked to “erase” the scratches. I have noticed that it’s better to put the oil on the scratches as soon after they happen as possible. NOTE: Be sure you test any conditioner first in an unseen area of leather to be sure it reacts with your couch. I also condition the couches every couple months with the same leather conditioner (Amazon). I swear it works miracles!!!
  3. HAVE SCRATCHERS AVAILABLE: We have lots of scratchers around the house for them as alternative things for them to sink their little claws into. I use mobile cardboard scratchpads which are easily to tuck away. These are the ones I use: Amazon and I just keep one on each floor or zone in our house. You can even get some catnip (Amazon) to sprinkle on it if you want to draw their attention to using them! A little goes a long way so even just a cup of it should last you a while.
  4. HAVE A CAT TREE: Somewhere in your house, you should have a cat tree set up. Ours is in their cat room and it’s basically a piece of furniture specifically made for cats to scratch. Since our cats spend half their days in their cat room (they sleep there at night), they have full access to it and get most of their scratches out of their system then. Here are some cat tree options: Amazon | Amazon | Amazon | Amazon | Amazon | Amazon | Amazon | Amazon
  5. USE VERBAL CUES: Contrary to common belief, cats *are* trainable. They’re very smart, just also stubborn. But if you’re 1) consistent, 2) firm, 3) gentle with your verbal cues, they do learn. It is absolutely vital that all 3 elements I just mentioned in order for it to work. Consistency is key. They’re not human and they’re not mind readers so they don’t intrinsically understand the concept of a special piece of furniture that shouldn’t be destroyed so you have to be consistent in telling them a firm but gentle “No” with the same tone in the same manner for several times before they start to understand it on their own. Do not spray them with water, yell, or lunge towards them. That just scares them without actually teaching them anything and turns them sour towards you. Instead be consistent, firm, and gentle in your verbal cues and before you know it you and your kitty will come to an understanding. But it is important that this tip is paired with the one above it (having scratchers) around because if you tell them they can’t scratch your couch but you don’t offer them anything else to scratch instead, then it’s not fair. Try to understand where they’re coming from. Scratching is an innate instinct for them so the goal is to try to give them a safe, non-furniture-damaging way to do what they were born to do. If you want to learn more on the specifics of how I train out cats, I have a whole detailed post on How to Train Cats & Kittens!
  6. DISTRACT THEM: When introducing anything new and special to your house (like our couches, or new table decor, or really anything), I always try to have something else in the room that is even more attractive to the cats to draw their attention away from whatever I’m adding. In our case, I kept some of the fabric wrapping the couches came in pooled on the floor and the cats were way more interested in that. It’s also important to note that cats are curious by nature. If you try to keep them away from something, it’ll only make them want it more. Let them sniff and inspect things and by you not making a big deal out of it, chances are they’ll move on pretty quickly too.
  7. TRAINING: As a side note, I’ve been around dogs my whole life (these are our first cats) so I feel like I’m mentally used to training pets so I’ve also kinda trained our cats not to destroy our stuff just using the same firm but calm methods you’d use to train a dog, as mentioned above. They’re pretty good about generally listening to verbal cues — they understand the difference between a firm “no” and warm praise so I’ve used that with a lot of calm repetition to train them away from our furniture. For more info, read my How to Train Your Cat/Kitten post!
  8. CAT ROOM: Our cats sleep in a separate closed “cat room” (room tour here). When we first moved in, we used a spare bedroom as a “cat room” where we let them acclimatize to our house so they wouldn’t get overwhelmed. I still put them away there at night because they love that room (it’s a kitty haven!) so I don’t worry what they’re sinking their little claws into at night. Remember cats are very active at night so keeping them in a separated room they feel safe and happy in at night might also help save your furniture. It is very important that the room you choose as the cat room is a space they feel comfortable in and that going to this room is a positive experience, it’s also important that it be properly set up with food, water, litter, beds, toys etc so that they have everything you need while you’re sleeping. It’s also a great room to put your cats when guests come over/during loud holidays etc if your cats are scared of new people/noises. This allows them to have a zone they feel safe in even though there are people/noises around they don’t know or might scare them. Ultimately it’s about creating a safe space for them, both for their sake, and for your furniture’s sake.

I hope this helps!!

More cat-related posts that might help:

  • Cat Room Tour: click here
  • Cat-related Sources & Cleaning Tips: click here
  • Cat Training Tips: click here
  • How to Introduce New Kittens to Older Cats: click here
  • How to Cope with Cat Allergies: click here
  • Cats & Decor Tips: click here

Filed Under: Cats

How to Train Cats and Kittens

September 30, 2019 by admin 6 Comments

Ever since we got new kittens, we’ve had to teach them our basic house rules that we’ve already trained our big cats to know like not to go on food counters and food tables, not to chew on furniture, not to use decor as a toy etc. so I thought I’d share my training tips:

REPETITION IS THE KEY TO EVERYTHING.

Calm, firm, consistent repetition will create habits in your cats that will become their new normal once they’re trained. Cats are not like dogs (I’ve had and trained both cats and dogs successfully so I’m speaking from experience). Their response time is generally slower, but the goal is to create good habits, and habits are formed by repetition.

My house rules for the cats are pretty simple:

  1. No paws on food counters or tables (kitchen/pantry and dining).
  2. No playing with my decor or damaging/scratching furniture

That’s it. My rules are clear and consistent. There are no exceptions. They’re not “sometimes” allowed to do these things (no matter how cute they are) so there’s never confusion for them over what is/isn’t allowed. And the rules are simple/repetitive enough to turn into habits. So here’s how we train them:

  • STEP 1: Verbal cues/discipline. I believe the best way to discipline a cat/kitten is using verbal communication. Do not yell at your cat. The goal is to teach them, not scare them. I personally use a particular “No!” that I say in a loud, firm, non-emotional, warning tone of voice. I use the SAME tone each time I say it. Cats don’t speak our languages so if you say “No” twenty different ways it’s not clear to them that it’s the same word so they’ll have no idea what you mean. Instead, teaching them ONE word, spoken consistently in the SAME tone is much easier for them to understand and therefore learn to respect. So stick to one consistent word for all activities you want them not to do. I make the tone in which I say “No” sound exactly the same each time so they can easily/quickly recognize it. — Also a single-word “No!” command is a lot easier for them to understand than speaking a string of words at them like “Omg Fluffy don’t touch my favorite vase!” because that’ll just go riiiiiight over their heads (understandably). —  If they’re ignoring my “No!”, I’ll then accompany the “No!” with a sharp clap of my hands. This “No!+Clap” is what I use to discourage an action I don’t want my cat to take. For an example: let’s say they’re chewing on a basket and you do the “No+Clap” thing, they stop for a minute, then resume the chew. You have to do it again exactly as they resume chewing. This associates your reaction with their specific action. Repetition is key. Chew, no+clap, pause, chew, no+clap, pause, chew, no+clap, etc. This might repeat 6-7 times. But eventually they’ll likely move on to something else. If they don’t, then rattle a toy to encourage them to leave the site of the issue and then that’s enough for that lesson. Remember: you’re not going to teach them anything in one, two, or even three sittings, so be patient, kind, and repeative. Even if the first few times they don’t correctly respond to your “No+Clap”, they’ll remember what happened and the next time they do it and you correct them, they’ll have a moment of ‘huh, same thing happened last time’ and are more likely to understand over time that you don’t want them to do that action.
  • STEP 2: Physical intervention. This is a gentle action. What this means is simply you stepping in, and gently stopping them from doing whatever it is they shouldn’t be doing, or possibly even gently picking them up and walking them to a different part of the room/house away from the trouble area and giving them something they CAN play with. “Step 2” should only happen if “Step 1” has been tried and didn’t work EACH TIME you do the correction. Verbal correction should always be tried first. Not just one time, but every time you correct them both during training and forever after. NEVER HIT OR CHASE your cat. This will only teach them to fear humans and will not resolve the issue or teach them better behavior. You’ll get a lot further with calm, gentle, kind corrections. The reason why I generally don’t believe physical intervention works as well for training specifically is that it introduces another “action/element” into the situation — simply the act of physically stopping them literally changes the dynamics of situation you’re trying to train them not to do and it confuses the entire situation making it hard to learn from. However, it is usually pretty successful though so it’s a “quick fix” rather than a teaching moment. But if they’re really not listening to my voice/claps, I will gently and calmly pick them up (no snuggling or rewarding, just picking them up) and move them to another part of the house with a toy they *are* allowed to play with. You MUST do this kindly because you don’t want your cat to associate anything but good things with physical contact so don’t stomp over and don’t show any anger or aggression, just be quiet, calm, and firm. They will learn.
  • FOLLOW UP: Don’t give up and don’t stop and be consistent. At first, it might not feel like your corrections are making any impact on the cat/kitten. But give it a few days or weeks, stay absolutely consistent with your corrections, and you’ll likely start to notice that they begin to understand. It will probably take a few days of constant corrections but they WILL learn if you’re consistent. Now, it’s important to understand that just like people, they’re going to make mistakes over time. They’re not perfect creatures – none of us are. So I will occasionally (like once a month or something) have to correct one of our older cats even from jumping on the table, but for the most part they understand and know the rules. Be forgiving – you make mistakes in life too – but be consistent so that they understand. Remember, if you’re constantly varying your correction or only correcting them sometimes, that will just confuse them. They have no understanding of why you’re asking them to do whatever you’re asking them to do and you have no way of explaining to them the logic of it so if you think about it it’s actually a pretty big ask of us to tell them that they arbitrarily can’t do something. So be patient, be gentle, repeat repeat repeat, and they will learn.

Timeline: It took about one week for our new kittens to really show understanding for our house rules. That was one week of consistent, gentle, firm repetition from me. After about a week, they started to show clear signs of understanding what I meant when I said “No!” in my warning tone and would back away from actually whatever activity they were doing. And it took about a solid month before they got to a point where I’d rarely even need to give verbal corrections. Every cat/kitten will be different though and it also depends on how vigilant you are. Honestly, in most cases, you are actually the determining factor for how successful the training is, not your cat. They have a saying with horse riding that goes something like “there’s no such thing as a bad horse, there are just bad riders” and that kinda applies to cat training too. Ultimately it’s on us as the trainers who are trying to instill our house rules on these other creatures (who don’t naturally understand them) to be responsible for taking the time to train them properly and kindly.

A few more notes and tips on this subject:

  • Avoid problems. Sometimes if I see one of our cats going towards something they shouldn’t do (like if I see one of them eyeing our kitchen counter but they haven’t actually tried to jump up yet), I’ll intervene and distract them entirely. I might scoop one of them up and give them a little snuggle to distract them, then walk to a different place in the house and place them down there. Or if I see them thinking about swatting my decor, I’ll just rattle a toy. If you watch them closely, you can anticipate a lot of their actions and over time you’ll just learn their mannerisms and “know” what’s coming. Sometimes avoidance is just the easiest answer.
  • React in levels. Once you’ve completed the basics Step 1 and Step 2 and your cat understands what it is you don’t want them to do, you can have levels to how you react to things in the future. What I personally do is this: as soon as the cat goes to do something they’re not allowed, I’ll verbally say “No!” in the same warning tone of voice I always do when correcting them. I’ll do this once or twice. Usually, the “No!” makes them pause each time. But sometimes they’ll continue. Then I’ll escalate and ADD in a loud clap (without physically moving towards them). So “No!” + clap. Again, I’ll give them 2 chances to listen. If they really don’t listen, I’ll calmly walk over (without scaring them, because learning is the goal, not fear), pick them up (again, gently but firmly), and taken them to another room and put a toy in front of them. This removes them from the situation and offers them a “yes” toy. Also interestingly, no matter how many cats are around me, if only one of them is doing something they shouldn’t and I say the “No!” they always know who it is and that tells me that the cat who is doing the action they’re now allowed understands deep down that their action is not allowed and the other cats who are not doing anything wrong know they’re not doing anything wrong and they (rightly) ignore my “No!”.
  • Train your humans if there are many people in your household around your cats, take the time to train them in this method so that the cats are getting the SAME FEEDBACK from everyone. Make sure you’re all saying the “No!” in a similar manner, make sure you all understand the steps for training, and make sure you’re all on the same page. This is important because if your cat is not allowed on counters (for example) and you’re correcting them but your spouse lets them get away with it, then the training simply isn’t going to work effectively. So teamwork is key if you’ve got many humans in your house.
  • Never use your hands as toys. I know it’s tempting to want to use your hand to tap the floor/bed/whatever to get a cat’s attention, never do this. Hands should never be viewed as toys – this will help your cat never learn to scratch. Also, if they try to bite or scratch at your (often this is done accidentally in play), just make a sharp, high-pitched “ow” or “yip” sound that makes they know they caused pain. Do this even if they didn’t actually hurt you. Anytime their claws or teeth make contact with skin, make this high-pitched sound and they will learn never to bit or claw at people. This is how they learn with each other when they’re babies (cats and dogs both) so it’s a method they naturally understand and respond to.
  • Never let your kitten play with “found objects” from your house. They should only play with things that you give them as toys. This helps them learn the difference between their stuff and your stuff. Once the cats are older they’ll generally know what to do if you teach them this from when they’re small. Like at this point, all our older cats can go into our basement without supervision and literally rifle through our construction materials and they won’t mess with anything they shouldn’t. They’re really very good about it. But it’s because we were consistent when they were kittens and formed this as a habit in all of them. Of course sometimes they might play with something they find but you’ll have to judge that case by case. Don’t allow something just because it’s cute. Like in the basement, if they play with a piece of wood that’s on the floor, that’s fine. If they go into one of our open storage boxes and rifle through it, that’s something I’d say “No” to.
  • You can only correct what you SEE happen. If for example, you come into the bathroom and find your toilet paper roll in shreds but this was clearly done a while ago and your cat has moved on and is playing or sleeping elsewhere and you didn’t see it happen, you cannot go to the cat and communicate to them that this was not okay. They don’t understand our language and they don’t share our human logic. If you go and get mad at them for it, they’re not going to associate your reaction with their action and they’ll just see it as you being upset at them for no reason. So in order not to create confusion, only correct what you see happen BUT create scenarios where you are able to see most of what happens or simply avoid the problem. In this example: maybe keep your bathroom doors shut to prevent the cat from entering without your supervision.
  • Put them in their cat room at night or whenever you leave the house. This will ensure that while you’re sleeping or away, they won’t do all the things you’re trying to teach them not to do and get away with it. It is VERY IMPORTANT that your cat/kitten rooms be properly set up with food, water, litter box, cozy beds, and be cat-proofed so that they can’t do anything dangerous while you’re not looking. We still put our big cats in their cat room both at night and if we go out even though they’re responsible adult kitties who know all the rules. It never hurts to be cautious and this avoids problems you can’t see! You can click here for a tour of our cat room (right now the cats have their own room, and we temporarily turned our guest bedroom into a kitten room until they’re old enough to be integrated into the cat room, more on that in my post on How to Introduce Kittens to Cats). — I should note that you don’t need to have an entire dedicated room just for your cats, but if you can pick one room that you can fully cat-proof and make cat-friendly, this will give you a place to put them at night or when you’re out that is fully safe and where they can’t un-learn the rules you’re teaching them when they’re around you.
  • DO NOT spray cats with water or any other such deterrents. One of the most common things you’ll hear people tell you is that they spray their cats with water to try and get them to stop jumping on counters etc. Guys, this is the wrong approach. Spraying water creates a negative situation with you as the problem, but it doesn’t create any form of training opportunity. Let me flip this around: What would happen if I sprayed you with water if you touched my countertop? I’ll bet your first reaction would be anything from low-to-severe annoyance to outright anger, but I’m pretty sure the last thing you’d think is “Oh, I bet she’s spraying me with water because she doesn’t want me to touch her counter.” Spraying them only has the potential to teach them to fear a particular action in your presence because they will associate the sprayed water with YOU, not with the counter (since they will be able to jump on the counter when you’re not around without being sprayed). So I hope you can see that spraying doesn’t teach them anything other than fear of you or annoyance with you. In order to effectively teach them our house rules, we need to give cats the same respect we’d give a person. Spraying them with water is annoying, irritating, and doesn’t teach them anything other than creating a situation in which you did something really negative to them.
  • How to Stop Cats from Scratching Furniture: This is such a big topic that I’ve written an entire separate blog post on it with full details so you can click here to read the full post.
  • Our cats are NOT declawed. Declawing is a horrific, barbaric, inhumane practice that is banned or illegal in many places. Please NEVER declaw a cat, don’t even consider it! If you trim your cat’s nails weekly (I use this tool), offer them proper scratchers/scratch pads (I use these ones that are super mobile), and train them to be kind and gentle, that’s all you need. I’m putting this all in bold to emphasize how important this point is.

Regarding stairs and interior balconies: If you follow us on Instagram, you know that we have an interior balcony overlooking out living room that’s quite high. The first week we brought our kittens home, we let them play on the second floor and I quickly realized that they were so small and new to our home that they didn’t even understand what the balcony and stairs were and they’d try to weave in and out of the balusters, and simply didn’t have any fear around them because they didn’t understand that they ‘could’ fall. Since they had so much else to deal with with being introduced to a new family, new home, new big cats, we ended up keeping them completely blocked off from the stairs and second floor for over a month. I waited until they grew to be big enough that they wouldn’t accidentally slip through our second floor stair balusters and fall. When they first came home, they were tiny enough that their whiskers barely brushed the balusters and they were clumsy so I wanted to keep them safe and grounded until they grew bigger. When they got to be big enough to allow up, and after over a month of using my Cat Training Methods on our main floor to teach them the house rules, I did supervised upstairs visits with them where I’d open up the stairs, and let them explore and I’d follow close behind, ready to verbally correct them and teach them proper safety around the railings. We did this a couple times a week for a couple weeks. After about 5-6 times they learned the rules, and I’d graduate to ‘remotely supervised’ visits where I’d let them upstairs alone while keeping watch from downstairs ready to catch them or verbally correct them if needed. After a couple more times of this, they learned and now they have full access to the first and second floors and are have the training to be as safe as is reasonably possible.

Anyways, these are just my methods and they’ve worked for me so I hope they help you!

More cat-related posts that might help:

  • Cat Room Tour: click here
  • Cat-related Sources & Cleaning Tips: click here
  • How to Stop Cats from Scratching Furniture: click here
  • How to Introduce New Kittens to Older Cats: click here
  • How to Cope with Cat Allergies: click here
  • Cats & Decor Tips: click here

Filed Under: Cats

Fall Decor 2019

September 9, 2019 by admin 4 Comments

Fall decor (similar options to what I used, but they’re quite close):

  • Wheat wreath: I made ours (click here for tutorial), but here are some similar ones: Anthropologie | Target | Target | Target | Wayfair | Wayfair | Wayfair | Etsy | Etsy | Etsy | Etsy
  • Wheat bundles/stems: West Elm | Amazon | Amazon | Etsy | Etsy | Etsy | Etsy | Etsy | Wayfair | Wayfair
  • Faux pumpkins: Pottery Barn (multiple sizes/colors)
  • Faux pumpkins (punched ceramic): Pottery Barn
  • Faux pumpkins (gray glitter): Pottery Barn
  • Faux stems like living room: Target
  • Faux wild grass stems: Pottery Barn
  • Faux ivory hops stems: Pottery Barn
  • White pumpkins: Target (medium) | Target (large) | Crate & Barrel (small)
  • Plaid fabric pumpkin: Target (medium) | Target (large) | Target (mini)
  • Halloween wreath: Pottery Barn (even though I’m not focusing on Halloween decor this year, this is my favorite Halloween-themed wreath I’ve seen!)
  • All the rest of our sources are listed on the home page.

Filed Under: Holidays, Past Decor

  • « Go to Previous Page
  • Go to page 1
  • Interim pages omitted …
  • Go to page 4
  • Go to page 5
  • Go to page 6
  • Go to page 7
  • Go to page 8
  • Interim pages omitted …
  • Go to page 10
  • Go to Next Page »

Primary Sidebar

SHOP OUR HOME

Click any image below for sources from our pics!

WEBSITE ROADMAP

  • Shop Our Home
  • Sources by Room
    • All Sources & FAQs
    • Kitchen Sources
    • Pantry Sources
    • Living Room Sources
    • Dining Room Sources
    • Home Office Sources
    • Laundry Room Sources
    • Entryway Sources
    • Mudroom Sources
    • Gallery Wall Sources
    • Reading Room Sources
    • Theater Room Sources
    • Game Room Sources
    • Guest Bedroom Sources
    • Primary Bedroom Sources
    • Primary Closet Sources
    • Primary Bathroom Sources
    • Powder Bathroom Sources
    • Buffalo Check Bathroom Sources
    • Basement Bathroom Sources
    • Basement Sources
    • Stairs, Landings & Hallways
    • Paint Colors and Stain Recap
    • Cleaning Sources & Routines
  • Tutorials
    • How to Make a Staircase Gallery Wall
    • How to Make Textured Canvas Art
    • How to Install Shiplap
    • How to Build a Slat Wall
    • How to Paint an Ikea Dresser
    • How to Build Bypass Barn Doors
    • How to Build a Farmhouse Table and Benches
    • How to Build a Rustic Sideboard
    • How to Build a Slat Sideboard
    • How to Make a Sofa Pit
    • How to DIY a Faux Brick Wall
    • How to Build a Window Seat
    • How to Build a Paneled Accent Wall
    • How to DIY a Functional Play Kitchen
    • How to Stencil a Wall
    • How to Build a Round Table
    • How to Build a Console Table
    • How to Make Paper Stars
    • How to Make Paper Mache Bowls
    • How to Make Clay Links
    • How to Texture Bowls & Vases
    • How to Install Open Shelves
    • How to Make Wood Block Art
    • How to Make a Wood Bead Garland
    • How to Build Cabinet Doors
    • How to Build a Wood Countertop
    • How to DIY a Nightstand Charging Drawer
    • How to Make a Wheat Wreath
    • How to Hang Gallery Wall Frames
    • How to Stain Stairs and Paint Risers
    • How to Make Industrial Stair Railings
    • How to Build a Window Seat Cushion
    • How to Make Salt Dough Ornaments
    • How to DIY a Modern Mantel Christmas Tree
    • How to DIY a Wooden Christmas Village
    • How to Build a Wood Christmas Tree Collar Box
    • How to Make Paper Christmas Trees
  • Cats
    • Cat Room Tour & Litterboxes
    • Cat-Related Sources & Cleaning Tips
    • How to Cat-Proof Christmas Trees & Decor
    • How to Stop Cats from Scratching Furniture
    • How to Stop Cats from Playing with Decor
    • How to Train Cats and Kittens
    • How to Cope with Cat Allergies
    • How to Introduce New Kittens to Older Cats
  • Christmas
    • Christmas Decor Favorites 2023
    • How to Build a Wood Christmas Tree Collar Box
    • Neutral Christmas Present Wrapping
    • How to Make Paper Christmas Stars
    • How to Make Paper Christmas Trees
    • How to Make Salt Dough Ornaments
    • DIY Holiday Art Ideas
    • How to Cat-Proof Christmas Trees & Decor
    • How to Make Modern Tabletop Trees
    • How to Make a Wooden Christmas Village
    • Holiday Cheese & Snack Boards
    • Christmas Decor 2021
    • Christmas Decor 2020
    • Christmas Decor 2019
    • Gingerbread House & Cookies Recipe
    • Puff Tastry Christmas Tree Recipe
    • Christmas Decor 2018
  • Cleaning
    • Cleaning Sources & Routines
    • Minimalism: How To Get Started
    • Cat-Related Cleaning Tips
  • Recipes
    • Apple Turnovers Recipe
    • Baked Pumpkin Donuts Recipe
    • Banana Chocolate Chip Bread Recipe
    • Blueberry Lemon Cake Recipe
    • Cheese & Cracker Snack Boards
    • Chocolate Chip Cookie Recipe
    • Christmas Crack Recipe
    • Chocolate Crinkle Cookies Recipe
    • Cinnamon Rolls Recipe
    • Cinnamon Star Pastry Recipe
    • Coconut Curry Squash Soup Recipe
    • Creamy No-Cheese Pasta Sauce Recipe
    • Crumble Recipe
    • Easy Veggie Pasta Recipe
    • Fresh Rolls Recipe
    • Garlic Flatbread Recipe
    • Gingerbread Biscotti Recipe
    • Gingerbread House & Cookies Recipe
    • Healthy Hearty Salad Recipe
    • Homemade Bread Recipe
    • Lasagna Recipe
    • Molasses Cookies Recipe
    • Oatmeal Raisin Cookies Recipe
    • Pad Thai Recipe
    • Pesto Pasta Recipe
    • Potato Curry + Naan Bread
    • Puff Pastry Christmas Tree Recipe
    • Pumpkin Donut Bites Recipe
    • Pumpkin Loaf Recipe
    • Pumpkin Oat Muffins Recipe
    • Roasted Red Pepper Pasta Recipe
    • Rocky Road Bars Recipe
    • Vegan Bolognese Pasta Sauce
    • Vegetable Soup Recipe
  • About
    • About Us
    • Website Roadmap
    • Shop Our Home
    • Minimalism: How To Get Started
    • Privacy Policy
  • Blog

WHERE WE SHOP

Amazon

Wayfair

West Elm

Crate & Barrel

CB2

Pottery Barn

McGee & Go

Overstock

Rejuvenation

Joss and Main

All Modern

Target

Home Depot

World Market

Etsy

H&M Home

Lulu and Georgia

Serena & Lily 

Schoolhouse

Anthropologie

RECENT POSTS

  • Christmas 2023
  • Christmas Decor Favorites 2023
  • How to Make a Staircase Gallery Wall
  • Functional Play Kitchen DIY
  • Christmas Decor 2022
  • Cinnamon Rolls Recipe

Meta

  • Log in
  • Entries feed
  • Comments feed
  • WordPress.org

Footer

RECENT POSTS

  • Christmas 2023
  • Christmas Decor Favorites 2023
  • How to Make a Staircase Gallery Wall
  • Functional Play Kitchen DIY
  • Christmas Decor 2022
  • Cinnamon Rolls Recipe
  • Christmas Decor 2021
  • Cinnamon Star Pastry Recipe

SHOP OUR HOME

FOLLOW US

ON INSTAGRAM

For daily updates on our house projects and rescue kitties, follow us on Instagram @ahousewebuilt

ON SHOP.LTK

To shop our home pics daily, follow ahousewebuilt in the free SHOP.LTK app (formerly LIKEtoKNOW.it) now available from the App Store to get product sources from our pics. With this app, you can instantly shop your screenshot of any of our Instagram pics! We always link exactly what we have when available and often offer similar options as well!

Copyright © 2025 · Metro Pro on Genesis Framework · WordPress · Log in